Apple Pie Cookies
By cwyorkiex3
Promise me that you won’t mess around with soft pie dough, here or anywhere. The single easiest way to master pie crusts is to decide at the outset that you won’t waste your energy on limp, stretchy dough. As soon as your dough softens, transfer whatever you’re doing to the freezer for two minutes to chill it again. Soft dough is hard to work with. It’s stretchy and doesn’t cut clean shapes, it gets sticky and you compensate by over-flouring it and that stickiness is those tiny bits of butter that will be your layers of flakes later disappearing, melting before they hit the oven and sealing into zillions of buttery pockets. It will also annoy you and make you think that you’re bad at working with pie dough but you’re not. You’re just warm-blooded and you need to put the pie dough back to chill for two minutes.
Ingredients
- Crust
- 2 1/2 cups (313 grams) all-purpose flour, plus more for dusting surfaces, dipping fork
- 2 tablespoons (25 grams) granulated sugar (doubled from my standard pie dough to make this more cookie-like)
- 1 teaspoon (4 grams) table salt
- 2 sticks (225 grams, 8 ounces, 16 tablespoons or 1 cup) unsalted butter, very cold
- 1/2 cup (118 ml) water, very cold (I pour 1 cup and add ice while I work, then measure 1/2 cup from it when I need it)
- Filling
- 3 medium apples, whatever you like to bake with
- Squeeze of lemon juice (optional)
- 1/3 cup (67 grams) granulated sugar
- 1 teaspoon (2 grams) ground cinnamon
- Few gratings fresh nutmeg
- A pinch of any other spices you like in your apple pie
- To finish
- 1 large egg
- Coarse or granulated sugar for garnish
Details
Servings 24
Preparation
Step 1
Additional stuff
A couple baking sheets covered with parchment paper
Rolling pin, pastry brush (for egg wash), fork (for crimping and dipping) and sharp knife (to make slits)
Two round cookie cutters of different sizes. I used 2 1/2-inch and 1 1/2 to 1 3/4-inch rounds. You’ll want to make sure there’s at least a 3/4-inch different in the sizes, as you’ll need the extra margin to crimp your dough.
Make your pie dough: Whisk together flour, sugar and salt in the bottom of a large, wide-ish bowl. Using a pastry blender, two forks or your fingertips, work the butter into the flour until the biggest pieces of butter are the size of small peas. (You’ll want to chop your butter into small bits first, unless you’re using a very strong pastry blender in which case you can throw the sticks in whole, as I did.) Gently stir in the ice water with a rubber spatula, mixing it until a craggy mass forms. Get your hands in the bowl and knead it just two or three times to form a ball. Divide dough in half. Wrap each half in plastic wrap and flatten a bit, like a disc. Chill in fridge for at least an hour or up to two days. [Even more detailed pie dough instructions in this post, check it out!]
Meanwhile, get everything else together: Line up six small dishes. In the first one, pour some water. Leave the second one empty; you’ll use it for your apples in a bit. In the third one, mix the sugar, cinnamon, nutmeg and any other spices you like in your pie, such as a pinch of cloves. In the fourth one, place a little bit of flour to dust your surface and dip your fork for crimping. In the fifth one, whisk an egg with one teaspoon of water until smooth. In the last one, or in whatever container you keep it in, add some coarse or regular sugar for decorating the tops of the pies. You are very likely thinking I’ve lost my mind by now and you may not be terribly far off.
On a well-floured counter, roll out your pie dough pretty thin, a little shy of 1/8-inch thick. Lift and rotate your dough as you roll it, to ensure that it rolls out evenly and so you can be sure it’s not sticking in any place. [More rolling tips here!] Use the larger of your two cookie cutters [mine was 2 1/2-inch) to cut as many rounds as you can from the dough. Transfer them to parchment-lined baking sheets and keep them in the fridge until you need them. Once you’ve finished the first packet, repeat the process with the second packet of dough
Prepare your apples: Peel your apples. Cut thin (1/8-inch thick) slices from one side of whole apple, stopping when you hit the core. Repeat on opposite side. I got about 10 usable slices from each side of my small-medium-ish apples. Use the smaller of your two cookie cutters (mine was about 1 2/3 inches) to cut the apples into cute little discs that will fit inside your pie cookies. Place them in your second bowl, covering them with a few drops of lemon juice if you find that they’re browning quickly.
Preheat oven to 350 degrees.
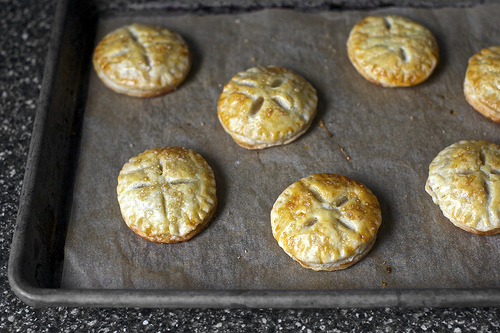
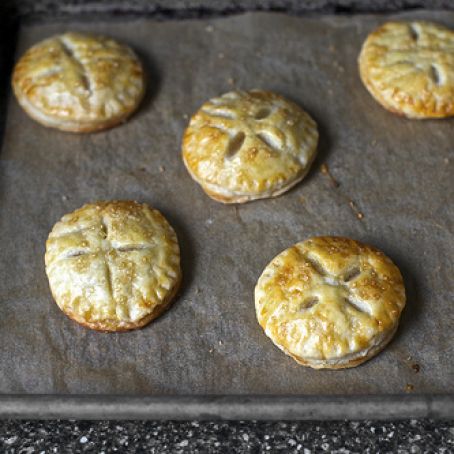
And now, assemble away! Grab your first disc of chilled dough and lightly dampen it on one side with the water. This is to help it seal. Take your first disc of apple and toss it in the cinnamon spice sugar. Place it on the damp side of the bottom disk. Place a second disc of dough on top; I found it easiest to seal it by picking the whole thing up (this is when you’ll be glad that your dough is cold and semi-firm; if it’s soft and getting sticky, chill it until it’s easy to pick up) and press the tops and bottoms around the apple with your fingers. Back on the floured counter, cut decorative slits in your “pies”. Dip your fork in the flour and use it to create a decorative crimp on the sealed edges. Brush your cookie with egg wash and sprinkle with coarse sugar. Replace on baking sheet and chill while you prepare the others. About now, you’ll curse your friendly food blogger for getting you into such an exacting cookie making process but I promise, the first couple are slow and the rest come together very quickly.
Bake your apple pie cookies for 25 minutes, or until puffed and bronzed and very pie-like. (If this is your first batch, peer in at them at 20 minutes, to make sure your oven doesn’t run hot.) Transfer to a cooling rack to cool before eating them… oh haha. I forgot who I was talking to.
Do ahead: These will keep for a few days at room temperature, though not in my apartment. You could also make a larger batch of these, doing everything but brushing them with egg and sprinkling them with sugar, and keep them frozen until needed. Bake them directly from the freezer, just adding a couple minutes to the baking time.
You'll also love
-
 Panera Summer Corn Chowder (Copy...
3.7/5
(670 Votes)
Panera Summer Corn Chowder (Copy...
3.7/5
(670 Votes)
-
 Slow Cookers Vegetable Beef Soup
4.4/5
(110 Votes)
Slow Cookers Vegetable Beef Soup
4.4/5
(110 Votes)
-
 Unstuffed Cabbage Rolls
4.4/5
(118 Votes)
Unstuffed Cabbage Rolls
4.4/5
(118 Votes)
-
 Lemon Garlic Shrimp over...
4.5/5
(103 Votes)
Lemon Garlic Shrimp over...
4.5/5
(103 Votes)
-
 Apple Pie Filling
4.4/5
(119 Votes)
Apple Pie Filling
4.4/5
(119 Votes)
Review this recipe