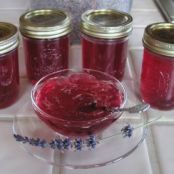
Pepper Jelly How to Set
By á-169813
Set Failure
Jelly may fail to set for several reasons. Jelly is made of four components -- fruit, sugar, acid and pectin. In order for these components to mix and gel, a hard boil is required for about one minute. If a jelly does not set, it is likely that one of its key elements is missing or it was not properly boiled. Measuring fruit, sugar and pectin exactly is key to a good set, as is a rolling boil. This means that the jelly is boiling so hard that it cannot be stirred down. If all of these steps are completed, the jelly should set. If not, you can fix the problem in a few steps.
Is It Set Failure?
To determine if you have set failure, wait until all jars are cool. Some jellies may take up to 48 hours to gel, so do not rush to fix the jelly if it is not thickened within a day. Instead, leave the jelly on the counter at room temperature. When 48 hours has passed, turn the jars upside down and see how long it takes for the jelly to move. If it is completely liquid, this is surely set failure. Even if it holds a bit, you may wish to fix the jelly to create a more spreadable one. If one jar fails this test, it is likely that all of the jars in a batch will fail as well.
Fixing Runny Jelly
You will need to re-cook the jelly to fix it. To do this, open all of the jars and pour the contents into a large pot. Keep track of the volume of jelly, writing it down as you go for accuracy. Wash the jars and prepare them and new lids for canning. Bring the jelly to a boil over high heat. For each quart of jelly, whisk in 1 tablespoon of pectin and stir constantly until the jam appears to thicken slightly. Test the set using a plate test, a method that uses a chilled plate to quickly bring the temperature of the jelly down and determine its set. Once the desired thickness is achieved, fill the jars, seal them with new lids and the same bands and process them for 10 minutes in a boiling water bath.
Set Failure Alternatives
Sometimes you simply don't want to go through the hassle of re-cooking jelly. This is a great time to experiment with different uses for runny jelly. It makes a perfect syrup in most cases, able to give a fruity punch to waffles or pancakes. Whisk a tablespoon or two of powdered sugar into it to make a glaze for sweet breads or donuts. Runny jelly can also be used as a topping for ice cream or baked fruit to give it a sweeter, more dynamic edge.
 0 Picture
Ingredients
- sugar
- water
- lemon juice
- pectin
Details
Preparation
Step 1
***Lane NOTE on the “boil one minute” directions on packages of pectin:
They’re bogus!
Basically, I can’t for the life of me understand why that became the norm in pectin instructions … because–in my experience–boiling your pectin-added fruit spread for “one minute” only works to create a proper gel maybe 15-20% of the time. With the other 85% of batches, it takes more time to accomplish the right gel consistency.
Why is that? Because–despite the fact that the chemical bonding of “x-amount of sugar, x-amount of acid, and x-amount of pectin…combined in the presence of x-amount heat for a duration of X” seems like a fairly simple chemical reaction–the actual chemical composition of the combination of those four things ~PLUS~ the fruit you have in the pot on your stove right this second can vary pretty widely. In other words, the sugar/acid/pectin/heat combo is pretty standard … but the fruit itself is your wild card when you’re making a pectin-added spread. In no small part, that’s why the NCHFP doesn’t have a ‘one size fits all‘ pectin-added jam or jelly recipe … because blueberries and oranges (or any other two fruits you might consider) require a different combo of add-ins to and processing to turn them into jam/jelly … but what they don’t really discuss at the NCHFP is how widely a single fruit can actually range chemically and structurally, even on/from the same tree/bush.
For example–when a recipe calls for “one cup of peaches”–a cup of chunks of barely ripe/still kinda hard and dry peaches creates a very different chemical and physical environment in your pot … than the pot of jelly/jam you’d create using a cup of extremely ripe and juicy chunks of peaches. In addition to the obvious difference in moisture content–which will definitely affect how long you may have to boil your pectin-added fruit spread to get it to gel properly–there are also some basic chemical differences between nearly green-vs-very ripe fruit, too. Plus, if you weigh those two cups of peaches individually, you’d probably discover that the juicy/riper cup of peaches definitely weighs ~more~ than the cup of less-ripe chunks of peaches do, thanks to the fact that there’s less air trapped inside of a peach on a cellular level when it’s riper than when it’s greener (because the air spaces inside the cells of a rapidly growing piece of fruit gradually fill with juice as it mellows/ripens), and to the fact that softer/mushier pieces of fruit can more easily slide around each other/compact down into a measuring cup … unlike the harder, less-ripe pieces. And then different sized chunks can ~also~ make a significant difference in how much actual fruit you can pack into your measuring cups … and–by extension–in how your fruit cooks down, too. Think about how much air space you have between the pieces in a measuring cup filled with–for example–3/4″ peach chunks … and what that same measuring cup would contain if you–instead–filled it with finely-chopped peaches, all packed tightly. Even if both cups were filled with the exact same peaches, how you cut/chop them up can make a big difference in how much you can get into a cup … yet–as far as a recipe is concerned–they’re both technically “one cup of peaches.” Plus, if your peaches are hard … it takes longer to cook them to get them soft than it does when the fruit’s already soft as it goes into the pan … and then blah, blah blah-blah, blah … you get the picture ?
Of course, working by weight rather than volume–like many professional chefs and bakers do–is one way that some people get around some of the problems with measuring chunky agricultural products by volume … but it’s not a method that’s very popular in US homes, therefore it’s not the way most US recipes are written. Of course, measuring everything by weights can be problematic in a recipe as well, since a pound of almost green peaches might weigh the exact same amount as a pound of very mellow and juicy peaches … but they’re definitely NOT the same structurally or moisture content-wise … so they won’t cook/gel the same either … even though they weigh the same. And all of those derivations are before we start talking about how things like pot size, burner heat, relative humidity, elevation, and a whole lot of other factors can impact how long you have to boil your pectin-added fruit spread in order to get it to the proper gel consistency.
So there are a TON of mitigating factors stacked up against that whole ‘boil one minute’ thing … because there are a TON of mitigating factors in what “one cup of peaches”–or of any other agricultural product–is going to mean in actual working reality in your jam or jelly pot. Therefore, in order to compensate for the natural differences in the fruit itself, you have to cook each pot of jelly/jam according to its own individual chemical and moisture content. The problem is, that usually doesn’t translate into “boil one minute.” The reality is, you need to boil your fruit spread for as long as it takes to make it set up its own gel … however long that takes.
So, if you can’t rely on that “one-minute timer” thing … then how do you know how long you need to cook that pot of jam/jelly sitting in front of you?
Easy. Go old school! What I mean by that is … do what my grandmother taught me to do: stick a stack of five or six glass or ceramic saucers–the heavier/thicker … the better–in the freezer the day before you plan to cook fruit spreads. Then, once you get to the point that you add your pectin in and start to cook your fruit spread for what the box says should be “one minute” … check the potential set on one of those frozen saucers at the end of one minute. If it’s not showing you the right amount of set yet, stick that saucer back on the bottom of the stack in the freezer, wait a minute, then check it again on another saucer. If it’s still too thin … then keep testing it every minute–or two in the beginning, especially if your first few tests show it’s still kinda loose overall–rotating the saucers in/out of the freezer (and using different sections of each saucer each time, too) so that you have a good, cold spot each time you start a fresh test … until your jam/jelly shows you on the test plate that it’s going to set up the way you like it.
How do you do the actual test? Easy! Pull a frozen saucer out of the freezer, drop a thin drop of your boiling fruit spread on the saucer, and roll the saucer around a bit to spread the drop as it cools, if necessary. Once it cools completely–I touch the back of the saucer right where the drop is sitting to see if it’s cold there again … that’s usually a good sign–push the tip of your finger into the drop where it meets the plate. If your finger runs right through the drop … and the wet jelly/jam simply parts like water … it’s not ready yet. Stick that saucer back in the freezer on the bottom of the stack, keep boiling your fruit spread, and check it again on a fresh saucer after another minute or so. And each time you check it, be sure that you have good light and get close enough to it so you can really see how the fruit spread acts as you push forward on the drop.
Boiling your pectin-added fruit spread to the gelling point could take one minute … or five minutes … or even ten+ minutes. Basically, what I’m saying to you is this: don’t fret if it takes a lot longer than “one minute” to get your fruit spread to the right texture. There are a ton of factors that can affect how long it’s going to take, including the current humidity and temperature in your part of the world, what sort of pot you’re using, how big it is when compared to the amount of fruit spread you’re cooking … AND compared to the size of the burner underneath it, how old the pectin is, how fast you’re cooking it, how often you’re stirring it … and a whole lot more! And I know you see warnings about over-cooking your pectin, but the odds are that–if you included all of the proper pieces of the chemical puzzle–it’s going to gel eventually, right? So–in that case–you can’t overcook it until it gels first, right? Besides, you’re checking it once a minute and plan to stop when you see the right gel, so you’re probably safe on that aspect. You’ll be able to stop the cooking instantly when you see the gel you want.
Even with the proper chemicals on board, until you get enough moisture evaporated out of the mixture … if you stop the cooking based on a timer, then you’re probably just going to end up with chunky syrup. It’s only when your cooled fruit spread starts mounding up in front of your finger as you push it against the drop on the frozen saucer–with almost a plastic-like crinkly surface to it–that it’s REALLY ready! That’s when you should pull your jam/jelly pot off the heat, let it sit for a minute or two to let the remaining bubbles rise to the surface … maybe stir in a teaspoon of butter to kill most of the bubbles, if desired … then skim the remaining foam, hot-pack into jars (sterilized if you plan to BWB them for less than 10 minutes … simply “clean and hot” if you plan at least a 10-minute canning cycle) and process according to the recommendations made by the NCHFP for that particular product.
I know it’s not as “easy” as simply setting a timer for one minute … but it’s the only way to be sure–every time–that you’ve achieved a proper gel before jarring your fruit spreads up!
Make sense? ?
You'll also love
-
 Pepper Jelly
4.8/5
(11 Votes)
Pepper Jelly
4.8/5
(11 Votes)
-
 Clear Hot Pepper Jelly With...
2.8/5
(17 Votes)
Clear Hot Pepper Jelly With...
2.8/5
(17 Votes)
Review this recipe