
 1 Picture
Ingredients
- 170 g (1/2 cup) light corn syrup (or golden syrup if you're across the pond)
- 58 g (1/4 cup) butter, room temperature
- 375 g (3 cups) confectioner's powdered sugar (icing sugar)
- 1 teaspoon vanilla
- 1/4 teaspoon salt
- yellow food coloring
- 1 (12 ounce) bag milk chocolate chips
Details
Preparation
Step 1
To make actual hollow eggs with the filling inside, you'll need to acquire some egg molds. Alternatively, you can form the filling and dip it in the chocolate. If you choose the dipping method, you may consider adding 2 teaspoons of non-hydrogenated vegetable shortening to the chocolate to thin it and make it easier for dipping.
Cream together the corn syrup, butter and vanilla.
Sift in the confectioner's powdered sugar and beat until incorporated.
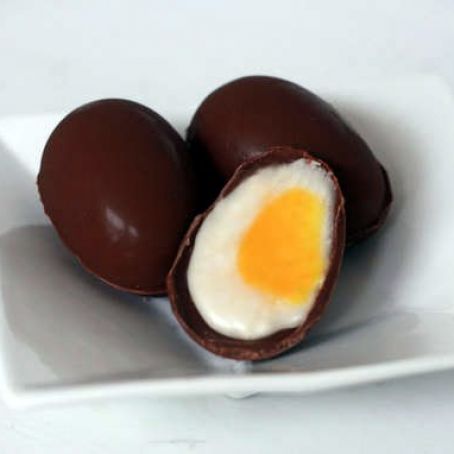
Now to get fancy and separate the filling into whites and yolks!
Take out about a third of the filling and stir in some yellow food coloring. Now you're done!
Put the two bowls in the fridge, as they're easier to work with once they're set up a little.
This step is sticky! It helps to keep your hands clean and cold.
Make little yolk balls out of the yellow mixture. Place them on some parchment (seriously, not foil like I did. It was a mess). Put them back in the fridge or even the freezer to firm up. These babies get soft fast!
When the yolks are set up, you can start embedding them in the whites. Scoop an amount of white filling out and flatten it into a circle. Place the yolk ball inside, and wrap the white around it. Know what to do next? Stick it in the fridge.
*****If you do decide to use the egg molds instead of the dipping method, a friend recently suggested simply piping the whites and yolks into the chocolate molds with a pastry bag. This would save a LOT of time.
Melt the chocolate in a double boiler or in short bursts in the microwave. Fill the molds with the chocolate and swirl to coat the sides. Alternatively, use jorgegunn's method as detailed in Handmade Chocolate Boxes to fill the molds entirely, let the outsides set, and pour out the excess.
Once the molds are set, plop a filling ball into half of each mold. Using more melted chocolate, join the two halves of the egg together.
Let set and demold. The freezer does wonders for this step.
If you aren't using molds, you can try this method.
Melt the chocolate + 2 teaspoons of shortening in the microwave in short bursts until just melted.
Either dip fillings into the chocolate with a fork and let set on parchment, or skewer the fillings and dip them that way (a'la cake pops).
Once the chocolate is set, you can dip them again for an extra chocolatey shell!
Not all of my attempts were successful, and I feel it's as important for me to share my failed attempts along side my successes.
Here you can see that my shells weren't thick enough or sturdy enough or I didn't let them set up enough. There were a lot of delicious mistakes made this day. And in the end I discovered that the egg shape really isn't necessary to creating a really delicious candy.
Chocolate is hard enough to work with. If you have the patience to attempt adding a mold into the process, go for it. The results will be something truly spectacular!
Review this recipe