
Preserved Lemons (second method)
By LadyRev-2
 1 Picture
Ingredients
- 7-9 lemons
- 1/2 to 1 cup coarse or rock salt
- 8 black peppercorns
- 1 bay leaf
- 1 cinnamon stick
Details
Preparation
Step 1
Scrub the lemons with warm, soapy water to remove any wax that may be on them; rinse them well and dry them on a dish towel.
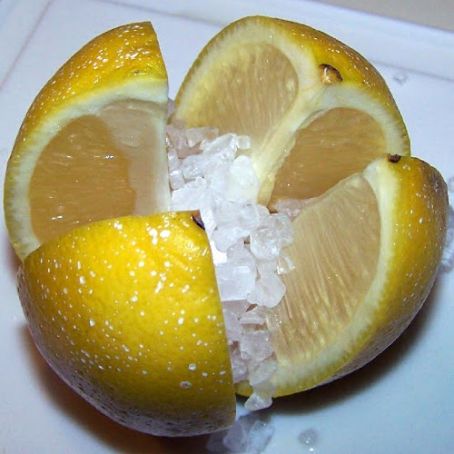
Quarter 6 of the lemons from the top to within 1/2 inch of the bottom.
Sprinkle as much salt as you can get inside on the cut areas, then reshape the fruit.
Scrub the lemons with warm, soapy water to remove any wax that may be on them; rinse them well and dry them on a dish towel.
Quarter 6 of the lemons from the top to within 1/2 inch of the bottom.
Sprinkle as much salt as you can get inside on the cut areas, then reshape the fruit.
Place 1 tablespoon salt on the bottom of a clean and sterilized quart-size mason jar.
Push the salted lemons down into the jar, adding more salt and the peppercorns between layers.
As you add each lemon, press down so that the juices are released and also to make room for the remaining lemons. Depending on the size of the lemons, you will be able to get 6-7 into the jar.
The juice released from the squashed lemons should cover the lemons in the jar; if it doesn’t, squeeze the juice from the remaining lemons so that it completely covers the lemons.
The juice should come to within 1/2 inch of the top of the jar, but make sure you leave a little air space before sealing the jar.
Add the bay leaf and push the cinnamon stick down into the jar.
Let the lemons sit in a warm, dark place, such as the inside of a cupboard, shaking the jar each day to distribute the salt and juice.
The lemons will take 30 days; I always mark my calendar 30 days out.
To use, remove a lemon from the jar, rinse under cold, running water, and add to the recipe according to directions.
Preserved lemons can be kept on the pantry shelf for up to a year; there is no need to refrigerate.
Note: Occasionally a lacy white substance forms on the top of the lemons; it is perfectly harmless and should simply be rinsed off for aesthetic reasons just before using.
Review this recipe