
CAKE - Cheesecake Pops
By Aemelia
 1 Picture
Ingredients
- Cheesecake
- Chocolate, melted
- graham cracker crumbs
Details
Adapted from bakerella.com
Preparation
Step 1
I used a small ice cream scoop and scooped up as many balls as I could, trying not to scrape the graham cracker crust into it. I didn’t want it to look ugly, you know. I guess, if I was going to make these on purpose, I would bake my cheesecake in a regular 2-3″ high cake pan and not use a crust at all.
Scooped Cheesecake
I got 12 easy, from half of the cheesecake. I could have probably squeaked out a couple more, but I might have eaten a few sections of cheesecake along the way. Maybe.
I didn’t really roll these, but I did kind of shape them a little to make them more round.
Cheesecake Balls
And, then because they were lumpier than I am used to with the cake pops, I dropped each one in a small bowl filled with graham cracker crumbs and rolled it around to coat. This helped to shape them better as well.
Then, I popped them in the freezer for a few minutes to firm up. (Maybe about 20-30 min. for these.)
While they were chilling. I heated up some chocolate candy melts in the microwave (30 sec intervals, stirring in between) and got my sticks and decorations ready.
Sprinkles
I went with teeny tiny hearts in red, white and pink. A hearts and jimmies mix in red, white pink and brown … and also just some dark chocolate that I chopped up in a mini food processor.
Note: I’m pretty sure a few of you are going to want to know where those baking cups came from. Check out www.confectioneryhouse.com
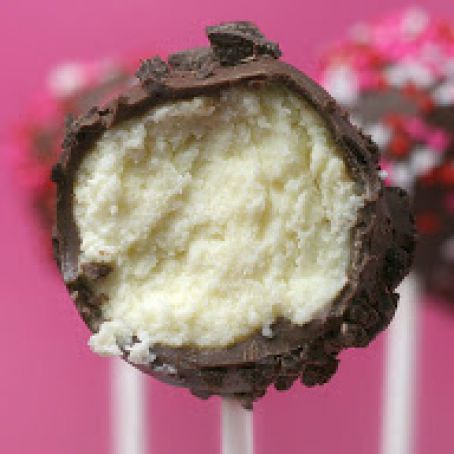
So, after the balls became firm, I dipped one end of my lollipop stick in some of the melted candy coating and then inserted it into the cheesecake ball. I immediately dunked the pop in a deep bowl of melted candy coating and then sprinkled to decorate. Each one was then placed in a styrofoam block to completely dry. Then, they went in the refrigerator to await their fate.
Note: It will really help if you use a bowl that is deep enough to completely submerge the pop in chocolate and remove in one motion. It also helps if your chocolate is on the thinner side. (You can melt a little shortening in it to thin it out some.) Once, you remove it, carefully tap the excess off while balancing the pop on the stick. You may need to rotate your hand so that gravity keeps the pop in place long enough for the chocolate to start to set around the base. Add the decorations before it sets too much also or they won’t stick to the surface. These were slightly harder to manage than the cake pops. One… they were larger and heavier because of using the scooper. Two… the cheesecake texture wasn’t as sticky as the cake pop mixture.
Review this recipe