
Can’t-F***-It-Up Fried Chicken
By AzWench
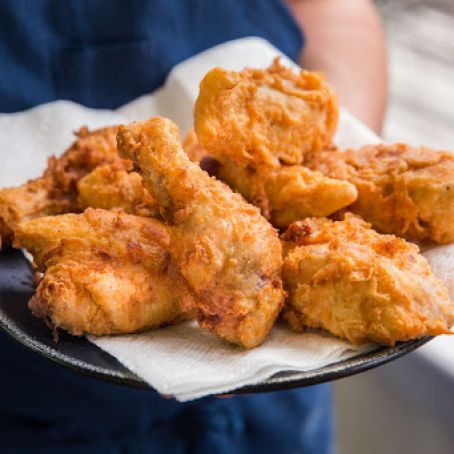
Fried chicken: everybody loves it. Making it, however, can be a stressful guessing game. We want you relaxed and happy when you’re cooking up a big batch of the crispy stuff, so here it is: a fried chicken recipe that’s almost impossible to f* up.
What makes this technique foolproof? We slowly cook the chicken pieces sous vide, ensuring that they will emerge exactly as we want them. The meat is juicy, with great texture, and since the temperature of the water corresponds exactly with the desired core temperature of those legs and breasts, they’re never under- or overcooked. Then we simply coat the pieces with buttermilk, flour, and whatever spices we’re in the mood for and give them a quick fry in oil. Forget standing at the fryer for 15 minutes (or much longer if you’re working in batches), hot oil getting the stove (and your face) all greasy and gross. When it’s already cooked sous vide, you can just fry your chicken until it looks good—usually just a couple of minutes! So go buy a bird and some beer. You’re about to whip up a fried chicken feast.
PSST: We’re super excited that we got to develop this recipe using Joule, our lovely little sous vide tool that you control with a custom cooking app and that features cool sous vide guides, handy notifications, and the sort of carefully created videos and images you expect from us. To learn more about it, head to Joule’s internet home.
 1 Picture
Ingredients
- Equipment:
- 0.5 Chicken, whole, or pieces, about 1 lb 15.8 oz
- 0.6 oz Salt, divided
- 1 liter Frying oil, we like canola
- Black pepper, freshly ground, as needed
- 13.3 oz Pastry flour, you can substitute all-purpose
- 0.44 oz Paprika, optional
- 0.36 oz Onion powder, optional
- 0.09 oz Garlic powder, optional
- 8.8 oz Buttermilk
- Sous vide setup
- Sous vide bag(s)
- Digital instant-read thermometer
- Dutch oven or stock pot
- Baking rack
- Sheet pan (optional)
Details
Adapted from chefsteps.com
Preparation
Step 1
Estimated time: 3.5–4 hr total; about 30 min active
1. Heat Joule (Sous Vide) to 155 °F / 68 °C
Tip: Try setting Joule with Facebook Messenger.
“Set Joule to 155 °F”
Holy cow, that is pretty cool!
2. Break down chicken (optional)
0.5 Chicken, whole, or pieces, about 1 lb 15.8 oz
Divide chicken into pieces. You’ll want to end up with skin-on thighs, drumsticks, and two whole, boneless breasts.
Of course, you can always just buy a bunch of chicken pieces—up to you.
3. Season chicken:
0.27 oz Salt
Season the pieces all over with salt. A good starting point is about 1 percent salt to the weight of the pieces.
4. Bag the bird
Place the pieces into sous vide bags, dark meat (thighs and legs) with dark meat, and breasts with breasts. Make sure pieces don’t overlap with one another.
Transfer breasts to the fridge to chill. We’re gonna cook the dark meat longer than the white meat—this ensures the former has enough time to do its thing and the latter retains its juicy goodness.
5. Cook:
Drop dark meat in water. Cook for at least 2 hours. Add breasts and cook all pieces for an additional hour.
6. Heat fryer to 400 °F / 204 °C
1 quart
Frying oil
Heat at least 3 inches / 8 cm of frying oil in a dutch oven or stockpot over high heat until the oil reaches about 400 °F / 204 °C. (Don’t worry about being super precise here. A few degrees either way won’t make a big difference.)
TIP: If you are working ahead or plan to fry in batches, set yourself up so that your chicken pieces will stay warm until service. First, line a sheet pan with a wire rack and place it on the middle shelf of your oven. Then set the oven to “warm” or to the lowest possible temperature setting.
7. Make breading:
0.36 oz Salt
Black pepper, as needed
13.3 oz Pastry flour, or all-purpose
0.44 oz Paprika, optional, or other spices
0.36 oz Onion powder, optional, or other spices
0.09 oz Garlic powder, optional, or other spices
8.8 oz Buttermilk
Remove cooked chicken pieces from the water and pat dry. Cut breasts in half, lengthwise, so there will be more surface area for crispy, crusty goodness. Place chicken pieces on a metal rack.
Set up your breading station: Mix the the dry ingredients together in a bowl and set aside. Add buttermilk to a second bowl.
Here you have a choice: Do you prefer your chicken more crispy or more crunchy? If you’re in what we call “the camp that loves to feel the crunchiness in the back of your head,” dredge pieces in flour, then buttermilk, then flour again. For crispier chicken, just dunk the pieces in the buttermilk, then move them to the bowl with the dry ingredients, then fry. Not sure what you prefer? Try both and see which texture you prefer.
Return each breaded piece to the rack and repeat until you’ve coated them all.
8. Fry time:
Working in batches, fry the chicken pieces in the oil until they’ve got a gorgeous, golden crust, about 2–3 minutes. (Remember, the inside is already cooked just the way you want it, so as soon as the crust looks good, you can pull pieces from the fryer. Pretty cool, right?)
Transfer the finished pieces to the wire rack in the oven to keep warm.
9. Dig in!
Ermahgerd, hot, crispy chicken. What are you waiting for?
Review this recipe