
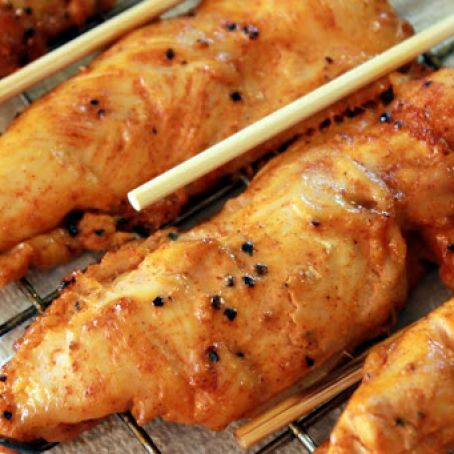
Smoked Chicken on a Stick
By KennyB07
 1 Picture
Ingredients
- What You'll Need
- (2) packages of chicken breast tenders. (mine had 10 pcs per package)
- 1/2 gallon of water
- 1/2 cup kosher salt
- 1/2 cup light brown sugar (dark will work if it's all you have)
- 1/4 cup of Hellman's REAL mayonnaise
- (1) batch of Jeff's original rub (purchase recipes here)
- (1) batch of Jeff's barbecue sauce (purchase recipes here)
- Note: the breast tenders were about 1/4 inch thick or so. You could also buy whole skinless, boneless chicken breasts and cut them into pieces yourself.
Details
Preparation
Step 1
Brine the Breast Tenders
Estimated time: 2 hours
Brining chicken and especially the breast meat, is such an important part of making sure it ends up juicy and tender. The fact that it's so easy to do means you never have to serve dry chicken breast meat again in any form.
To brine:
Mix the 1/2 gallon of water with 1/2 cup kosher salt and 1/2 cup of brown sugar until the water is clear and all ingredients are dissolved.
Place the breast tenders in a zip top bag and pour in enough brine to cover. Zip the bag closed.
Place chicken breast tenders into a ziptop bag with brine
Place the bag down in a bowl to prevent the risk of leakage and place it in the fridge for 2 hours.
Set bag into a bow to prevent leakage
Note: About 1 hour into the brine is a great time to go get the smoker ready. You are looking for about 240 degrees if possible.
Once the brining process is finished, pour off the brine and rinse the chicken with cold water.
Rinse off the brine
Seasoning the Breast Tenders
Estimated time: 5 minutes
Here lately I have been using mayonnaise instead of mustard on chicken to help the rub to stick. If you think about it, mayonnaise is basically oil and eggs and you really can't ask for a better combination on the chicken.
Since this recipe calls for 20 pieces, you'll need about 1/4 cup of mayonnaise to get the job done right.
A dollop of mayonnaise to help the rub to stick
Stir the chicken around mixing it with the mayonnaise using a spoon or your hands if you like to get messy with it.
Stir the mayonnaise onto the chicken
Pour on about ¼ cup of Jeff's original rub (purchase recipes here) for great flavor.
Add the rub
Once again, stir the meat to mix the mayonnaise and rub and get a coating on the chicken.
Mix and mayonnaise to coat chicken
Getting the Chicken onto a Stick
Estimated time: 5 minutes
I did not get a good picture of this but it's pretty easy, just hold one of the breast tenders in one hand and push a stick through the center of the piece lengthwise.
Lay the completed pieces onto a Bradley rack or Weber grill pan as shown in the picture below:
Lay completed pieces onto a Bradley rack
I recommend that you get the smoker going while the chicken is brining but if you did not, you might want to place the chicken back in the fridge if it's going to take more than 30 minutes.
It is very important that the smoking temperature is as close to 240°F as possible and that you are able to hold this for about 30 minutes. Our main concern at this point is that the chicken does not overcook so I highly recommend that you stay right there with it while it cooks.
Note: I usually make a few extra pieces as testers
Getting the Smoker Ready to Cook
Estimated time: 30-60 minutes (depending on what type of smoker you are using)
As I say in almost every newsletter here lately.. all of my recipes are designed to be used in ANY smoker with no regard to whether it is electric, charcoal, gas or wood.
I have written some helpful information on the operation and getting the most out of several popular smokers below however, there is no substitute for experience. Like anything else, you will find that the more you use your smoker, the better you will get at controlling the temperature and making it work for you in the way that it should.
Bradley 4-Rack Digital Smoker – An electric smoker that is fully automated and keeps the temperature where you set it. It also keeps the smoke flowing via an automated mechanism that moves a new wood puck into the smoker every 20 minutes. See this smoker and read reviews on Amazon.com
Weber Smokey Mountain 22.5 Smoker – the king of charcoal water smokers. Add charcoal, water and wood and you're good to go for several hours. 3 dampers on the fire bowl allow you to dial in the air perfectly for maintaining perfect smoking temperatures. See this smoker and read reviews on Amazon.com
Big Green Egg – Ceramic cooker that uses charcoal. Add lump charcoal, light it and add some wood.. set the top and bottom vent and you're good to go for hours on end due to the thick walls that hold heat incredibly well.
Great Outdoors Smoky Mountain Propane Smoker – A propane smoker that works exceptionally well. I have had mine for more than 8 years and it still works great. See this smoker and read reviews on Amazon.com
More smokers on the way..
Note: In colder weather, it is advisable to preheat the smoker at least an hour or more before you are wanting to use it. Keep the door closed as much as possible and even skip basting if necessary to maintain proper smoking temperatures.
Smoking the Chicken Satays
Estimated time: 25-30 minutes
I wanted to use my gas smoker for these due to the inclement weather but I discovered that I was out of propane (bad planning on my part) and so I decided to use my reverse flow wood burning smoker by Meadow Creek for these.
I poured in an ample amount of lump charcoal and used 3 pieces of firestarter to get the coals going.
This is when it started raining and then sleeting!
Raining and sleeting on wood smoker
It took about 2 hours for the smoker to overcome the 20 degree temperature and the cold rain and pieces of ice hitting the smoker but I finally got it up to 240°F. I fed it hickory splits to build up a big bed of hot coals.
Once the smoker was holding steady, I grabbed the satays from the kitchen counter and quickly placed them in the smoker trying to not hold the lid of the smoker open any longer than I had to.
The temperature dropped slightly but quickly recovered.
At the 25 minute mark, I quickly opened the lid and grabbed one of the chicken satays from the grate and closed the lid again.
It was perfectly done, and it was very tender. If you check it at 25 minutes and the chicken is not quite done, just put it back in and check it again every 5 minutes or so.
It is very easy to overcook these so be careful or you will have chicken jerky on your hands.
Smoked chicken satays finished cooking
Serve the smoked chicken satays with Jeff's barbecue sauce (purchase recipes here) on the side or already brushed on.. your choice.
Serve them up
Notes
Due to the meat being so thin, it is difficult to use a probe thermometer to get an accurate reading on the chicken. I slightly overcooked my first batch trying to do this but it is the only safe way to really tell that the chicken is safe to eat.
You might be better off using a ThermoPop for these since it reads in 3-4 seconds and has a really small tip.
ThermoPop_generic-01
Regardless of what method you use, be sure the chicken reaches 165°F in the center.
If your chicken is a different thickness or the smoker is running at a different temperature, this will affect the length of time that it takes to get the chicken satays done. Make adjustments accordingly.
If you are wanting the charred look on the chicken satay then simply smoke them for about 15 minutes then finish them off on the hot grill with just a couple of minutes per side.
Review this recipe