
Homemade Halloumi
By stancec44
When I’m asked why I make my own jam, pickles, cheese or bacon, the first reason that comes to mind is: It’s more delicious. But it’s also plain old fun, and a little bit of magic.
The sleight of hand with which I convert a bottle of milk into a round of cheese never fails to thrill me. I certainly didn’t invent it; cheese has been made in home kitchens for thousands of years. Now that dairy-fresh milk, pasteurized but not homogenized, is more widely available, the DIY approach provides a chance to experience the difference in flavor and texture when cheese is free of stabilizers and other additives.
My latest cheese project is halloumi, a tasty, firm slab that could become your new go-to afternoon nibble, midnight snack or topping for a breakfast salad. This Mediterranean specialty is one of several fresh cheeses found across the globe — such as fromage blanc, paneer and queso fresco — many of which require nothing more than rennet to coagulate milk solids into a dairy staple and a few minutes here and there over the course of an afternoon.
Halloumi is categorized as a semihard cheese: Firmness is defined by moisture content, which is further determined by the temperature at which the milk is cultured and at which the cultured curds are cooked. A chewy cheese that squeaks against the teeth, halloumi can be marinated or fried or grilled until crisp on the outside. Because it’s not a melting cheese and retains its texture under heat, you can swap halloumi for tofu in just about any dish. It delivers a vegetarian-friendly, textural addition with a neutral flavor.
Rennet is essential for making halloumi; it aids coagulation and is available as either an animal- or vegetable-based product, liquid or tablet. A small box or bottle will be viable for a year tucked away in the refrigerator.
Equipmentwise, you’ll need a nonreactive pot, such as a stainless-steel or enamel-lined one, plus a long, round-edged palette knife and a thermometer. I like to use a cheese basket to mold a tidy form, but a plastic produce basket or a small colander works just as well. Even stabbing a few holes in the sides and bottom of a wide plastic deli container will work as a suitable cheese mold for draining away the whey.
To elevate the cheese basket above the whey that collects below, I use a deep dish and a draining mat: i.e., a bamboo sushi rolling mat. But a folded cotton tea towel will do the job, too.
Once drained, the halloumi needs to be stretched and salted. It must be simmered in its whey until heated through. It’s transferred to a bowl of cool water, then to a draining board for pressing and stretching while the cheese is still slightly, uncomfortably hot to the touch. So be brave and work quickly.
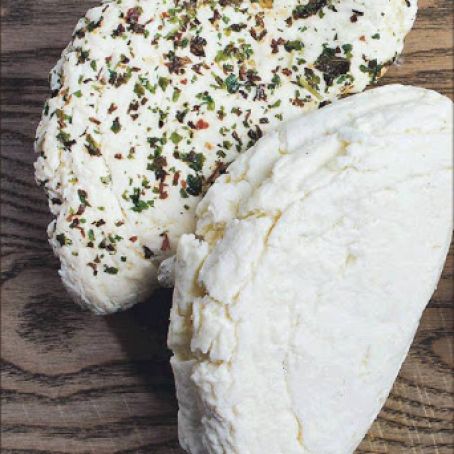
Adding salt is critical for both preservation and flavor. Most recipes call for a sprinkling of dried mint. To avoid an overdose of minty flavor, I balance the herbal scattering with dried parsley.
It is traditional to fold the freshly stretched, herb-scattered round into a half-moon shape.
Some halloumi is sold brined, but this is fresh, so the flavor and consistency of your DIY halloumi are best enjoyed right away. I’ve refrigerated halloumi that’s wrapped tightly in plastic wrap for up to two weeks.
I like to cut halloumi into cubes and fry them in a little oil until crisp and brown on all sides, then douse them with excellent olive oil, plenty of lemon juice and a dash of crushed red pepper flakes. Add a handful of cherry tomatoes, a few kalamata olives and chunks of seeded cucumber, and you’ve got a dangerously delicious snack.
It is traditional to fold the freshly stretched halloumi into a half-moon shape. It’s best enjoyed right away, but will keep in the refrigerator tightly wrapped in plastic for up to two weeks.
 1 Picture
Ingredients
- To recipes call for a sprinkling of dried mint. To avoid an overdose of minty flavor, balance the herbal scattering with dried parsley.
- to you don’t have a cheese basket to mold the halloumi and drain the whey, a plastic produce basket or a small colander will work just as well.
- Use only the freshest milk for the best-tasting cheese.
- Rennet, either animal- or vegetable-based, is available in liquid or tablet form at beer- and cheesemaking shops, at many Latin grocers and online. Use filtered, bottled water if your water contains chlorine, which is not good for cheese making.
- 1/8 1/8 1/8 teaspoon rennet
- 1/4 1/4 1/4 cup filtered, nonchlorinated water
- 1/2 1/2 1/2 gallon whole milk, pasteurized but not homogenized (often sold in glass bottles), or more as needed
- 1 1 1/8 tablespoon fresh lemon juice or 1/8 teaspoon citric acid
- 1 1 1 teaspoon kosher or fine sea salt
- 1 1 1 teaspoon dried mint and/or dried parsley, or a combination (optional)
Details
Servings 1
Adapted from digital.olivesoftware.com
Preparation
Step 1
Combine the rennet and filtered, nonchlorinated water in liquid measuring cup.
Pour the 1/2 gallon of milk into a nonreactive pot (preferably 3-quart) over medium-low heat; slowly bring the temperature of the milk to 86 degrees, stirring occasionally. If its temperature rises above 86 degrees, remove the pot from the heat as needed to maintain the proper temperature.
Use a slotted spoon or skimmer to incorporate the rennet solution by way of an up-and-down motion (agitating). Cover the pot, remove from heat, wrap it in a kitchen towel and place it in a warm spot. If your kitchen is particularly chilly, use a thicker bath towel; the goal is to maintain warmth. (Some people place the pot in a sink of warm water or on a heating pad.) Let it rest 30 to 40 minutes (this is called culturing), until the curd is firm.
Use the palette knife to slice into the curd and pull it apart at the cut. The cut should fill with the liquid in the pot, now called whey. If the curds are loose and wobbly, fall back into the cut and look like scrambled eggs, cover the pot again (still towel-wrapped); check back in 10 minutes. Once the curd is firm, make slices through the entire curd top to bottom, moving the palate knife across the pot in long lines 1 1/2 inches apart. Turn the pot 90 degrees and slice again, forming a grid of 1 1/2-inch squares.
Let the curds rest for 10 minutes, then cut them again, this time horizontally and in multiple layers, as many times as needed to form small curds. Stir gently, cover the pot and let the curds rest (to tighten up) for 15 minutes.
Place the pot over low heat and slowly stir the curds. They should have firmed up even further and there should be a good amount of whey, as more will have come out of the curds. Increase the heat slowly (to medium-low) over 20 minutes so the whey’s temperature reaches 105 degrees; hold it there for 15 minutes, adjusting the heat as needed and stirring occasionally. The curds will start to look like cottage cheese.
Place a folded kitchen towel or draining mat in the bottom of a baking dish or other deep-sided container. Line the basket mold with cheesecloth. Use a strainer or skimmer to scoop the curds out of the whey and place them in the basket mold, using the back of your hand to gently press on the curds every time you scoop (set aside the pot of whey). Fold the cheesecloth over the top and add a light weight (a filled can or jar, a bowl filled with pennies) on top of the cheese to gently press out the whey. This is a wobbly venture, but some tactical efforts will pay off. Let the cheese drain; then every few minutes flip the cheese over, placing it back in the basket and replacing the weight after each flip (three total).
While the cheese drains, bring the pot of whey to 150 degrees (over medium-low heat) and add the lemon juice or citric acid. To increase the yield of ricotta (called anari), you may wish to add an additional cup of whole milk. Continue slowly increasing the heat to bring the whey to 190 degrees. Small bits of cheese will rise to the surface; this is the ricotta. Scoop the bits out. (This will yield a few tablespoons — enough to top breakfast toast and drizzle with honey.)
Slide the pressed round of halloumi cheese into the whey that remains, which will be clear and slightly yellow. The halloumi will sink to the bottom of the pot. Let the halloumi heat in the whey, maintaining the temperature at 190 degrees, until it floats to the surface, at which point it is ready to be removed. This will take 20 to 30 minutes.
Fill a large bowl with cool water. Use a skimmer or strainer to transfer the halloumi for a brief dunk in the water, making the cheese just cool enough to handle yet still warm and pliable. Flatten the round to a thickness of about 3/4 inch, making it 8 inches wide. Sprinkle each side with the salt and the dried herbs, if using. Fold the cheese in half to form a half-moon. Drain on the mat for 1 hour. Wrap the cheese well and store it for 3 hours before serving to allow the salt to penetrate the cheese.
Review this recipe