
Farmhouse White Sandwich Bread
By broots
 1 Picture
Ingredients
- TO MAKE 3 LOAVES:
- 4 cups (1 lb, 4 oz / 566 grams) organic all-purpose flour
- 1 1/2 Tablespoons* (17 grams) instant yeast
- 2 Tablespoons granulated or brown sugar
- 2 Tablespoons safflower oil (or your favorite neutral oil, or melted butter)
- 4 cups (2 pounds / 908 grams) warm organic milk (or water), about 85° F
- 6 About 6 cups (1 lb, 13 oz / 825 grams) organic bread flour (or organic all-purpose flour)
- 1 1/2 Tablespoons (22 grams) salt
- TO MAKE 1 LOAF:
- 1 1/3 cups all purpose flour
- 1/2 tblsp instant yeast
- scant tblsp granulated or brown sugar
- scant tblsp safflower oil or melted butter
- 1 1/3 cups warm milk or water, about 85ºF
- 2 cups bread flour
- 1/2 tblsp salt
Details
Adapted from farmgirlfare.com
Preparation
Step 1
* To bake an even better loaf, you can reduce the amount of yeast to 1 Tablespoon (or even less). This will make your dough rise more slowly, so you'll just need to increase the rising times. You can reduce the yeast in pretty much any bread recipe; a lot of bakers go by the formula, 'half the yeast and double the rising time.'
Instructions:
Mixing and Fermentation (first rise)
In a very large bowl, stir together the all-purpose flour, yeast, and sugar (I use a wooden spoon). Make a small well in the middle of the flour mixture and pour in the oil and the milk.
Mix well, then continue to stir vigorously, slowly adding 1 cup of the bread flour at a time and stirring it in, until you've added 3 to 4 cups of bread flour and have a sticky, shaggy dough; this should take several minutes.
Cover the bowl with a damp tea towel (not something fuzzy like terrycloth) and let it rest for 20 minutes. (I keep a stack of flour sack towels in my pantry and use them constantly all around the kitchen). This rest period is called the autolyse.
Add the salt and 1 more cup of bread flour and stir it in as best you can. Add another cup of bread flour if the dough is still too sticky to knead. Turn the dough out onto a floured work surface and knead it with floured hands until the dough is soft and smooth, about 8 to 10 minutes.
As you're kneading, sprinkle a little more flour at a time as needed to keep it from sticking to your hands or the work surface. You want the dough to be as soft as possible without being sticky; you may not need the entire six cups of bread flour, or you may need a little extra.
Sprinkle flour in the dough bowl, place the dough in it, liberally dust it with flour, and cover it with a damp tea towel. Or you can let it rise in a straight sided, food grade plastic container with a snap-on lid, which is what I do now. There's no need to grease or flour the container. Use a felt tip pen or piece of masking tape to mark the spot on the container that the dough will reach when it has doubled in volume. (Click here and scroll down to see an example.)
Set the dough somewhere that is preferably between 70°F and 75°F until it has doubled in size, about 60 to 75 minutes. Ideally, the dough itself should be between 70°F and 75°F. It's fine if your dough is cooler; it'll just take longer to rise and will end up even tastier.
On hot days I use cold milk to make my dough, and on cold days I heat the milk to about 100°F (don't make it any hotter or you'll risk killing the yeast). If you keep your flour in the freezer (it's the best place to store whole grain flours), use warmer milk, or let the flour come to room temperature first. It's easy to check the temperature of your dough and ingredients with an inexpensive instant read thermometer.
When the dough is ready to be shaped, you should be able to push a floured finger deep into it and leave an indentation that doesn't spring back. Unless your dough is rising in a straight sided container, it can be difficult to judge whether it has doubled in size, which is the guideline most recipes use. I find the finger poking method to be more reliable.
Shaping and Proofing (second rise)
Turn the risen dough out onto a lightly floured work surface, flattening gently with your hands to break up any large air bubbles. Divide the dough into three equal pieces. The easiest way to divide up dough into loaves or rolls is with a stainless steel dough scraper, also called a bench scraper or pastry scraper. I have three, and they're always in constant use. Nothing works better for cleaning up the counter after working with dough or pastry.
If you're using a baking stone, put it in the oven now and heat the oven to 375°.
Shape the dough into loaves. There are many ways to shape loaves; I give instructions for my favorite method in this post: How To Shape Bread Dough into Sandwich Loaves and Some Simple Bread Baking Tips.
Place the loaves seam side down in greased loaf pans and dust them with flour (I use Spectrum Naturals high heat canola spray oil on all my baking pans). How do I get my sandwich breads so nice and tall? I cram a lot of dough into the pan. I love my Chicago Metallic commercial 1-pound loaf pans, which are a joy to use, come with a lifetime warranty, and will probably last forever if you treat them well. I've been using some of mine for several years and they still look new. They're approximately 8½"x4½"x2¾" and I often bake 2-pound loaves of bread in them.
If I want shorter, more square shaped bread, I use my Chicago Metallic commercial 1½-pound loaf pans, which are approximately 10"x5"x3". In the loaf shaping post mentioned above, you can see how much the shape varies when two loaves that weigh the same are baked in different sized pans. Both size pans are also great for baking quick breads, like my Beyond Easy Beer Bread, and cakes, such as this Orange Yogurt Loaf Cake.
January 2013 update: Looking for a commercial loaf pan that's exactly 9"x5". Last year I ordered this heavy gauge USA Pan, and it's really nice too.
Cover the loaves with a damp tea towel and let them rise until the dough springs back just a little when you gently poke it with a floured finger, about 40 to 60 minutes.
If you let the loaves rise too long, they may not have enough energy left to rise once they're in the oven, and they may even collapse. I was always so afraid this would happen that for years I unknowingly under-proofed my loaves of Farmhouse White.
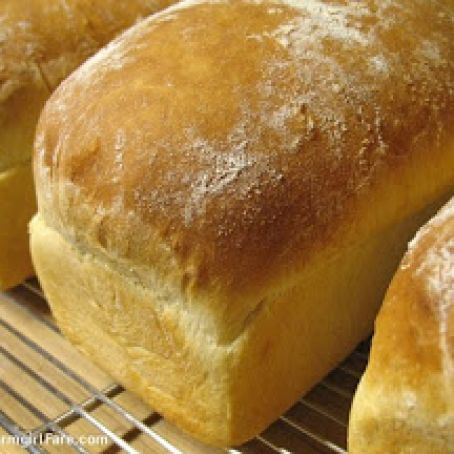
While the bread was still delicious, you can see that the dough had so much 'oven spring' that it basically blew apart the side of the loaf. I finally started letting the loaves rise a little longer and was rewarded with the more evenly shaped and visually appealing bread that you see in the previous photos.
Bake at 375° for 35 minutes, or until the loaves are golden brown and the bottoms sound hollow if tapped (you need to carefully remove a loaf from the pan to check this). Remove the loaves immediately from the pans and let them cool on a wire rack. The bread will continue to bake inside while it's cooling, so try to wait at least 40 minutes before cutting into a loaf.
Store at room temperature or freeze in zipper freezer bags. Make sure the loaves are completely cooled before sealing in bags.
Review this recipe