
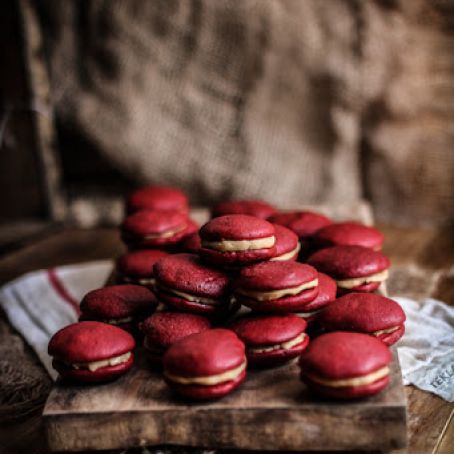
Red Velvet Whoopie Pies
 1 Picture
Ingredients
- Red Velvet Whoopie Pies
- 1 Egg
- 2 Cups Flour
- 1 Cup Brown Sugar, packed
- 1/2 Cup Butter, softened
- 1/2 Cup Buttermilk
- 2 Tablespoons Cocoa Powder
- 1 Teaspoon Vanilla Extract
- (1) 1 Ounce Bottle McCormick Red Food Coloring
- 1/2 Teaspoon Baking Soda
- 1/4 Teaspoon Salt
- Salted Caramel Filling
- 1/2 Cup Heavy Cream, at room temperature
- 1/3 Cup Granulated Sugar
- 1/3 Cup Brown Sugar, packed
- 1/4 Cup Butter, at room temperature
- 2 Tablespoons Water
- 1/2 Teaspoon Salt
Details
Servings 1
Adapted from adventures-in-cooking.com
Preparation
Step 1
First, make the caramel. In a small thick-bottomed saucepan mix together the water and the granulated sugar until well blended. Bring to a boil over medium-low heat and continue boiling until the mixture turns a light caramel color, only stirring once every four minutes. This took me about eight minutes, but the speed will depend upon the heat of your stovetop. Remove the pan from the heat and quickly stir in the heavy cream, butter, and brown sugar until incorporated. Be careful as the mixture will spit and hiss a bit. If the sugar begins to clump up when you're stirring do not fret, just stir as best as you can for about 30 seconds and then put the pot back on the heat and bring it back to a boil again over medium-low heat. Once it is boiling again stir until the sugar chunk dissolves and the mixture is smooth. Once it smoothes out, stir it every two minutes and allow the mixture to simmer for 10-12 minutes or until it has thickened. Remove from the stovetop and stir in the salt. Allow to cool to room temperature before placing it in the refrigerator to continue cooling. Once cooled, you want the caramel to be thick enough where it can be used as a filling without oozing everywhere, but still soft enough to mold with your hands into a soft ball. If yours is still liquidy after a stint in the refrigerator, bring it to a simmer and cook again for a few minutes until it thickens a bit, then cool it down again.
While the caramel is cooling, you can start making the red velvet whoopie pies. Preheat the oven to 375 degrees and line a large baking sheet with parchment paper. In a medium-sized bowl, mix together the flour, cocoa powder, baking soda, and salt until well blended. Set aside. Beat the butter in a stand mixer on medium speed for 30 seconds, then add the brown sugar and beat for 1 minute more or until creamed together.
Add the egg and the vanilla extract and continue mixing until they're fully combined. Now alternate between adding a bit of the flour mixture and a bit of the buttermilk until they have been completely incorporated. Turn the speed to a low setting and add the food coloring (be careful, you don't want it splashing about everywhere) and continue mixing until the batter is a nice consistent red hue.
Use a tablespoon to scoop a bit of the batter and place it on the parchment paper in rows with about 2 inches between each whoopie pie (they will expand a bit). Place the baking sheet in the oven and bake for 8-10 minutes or until the tops of the whoopie pies are set. Remove the pan from the oven and allow the pan to cool for 5 minutes before removing the whoopie pies and allowing them to cool completely on a wire rack.
When the whoopie pies are completely cooled, take a teaspoon to a tablespoon (depending on the width of your whoopie pies) of the salted caramel and roll it into a ball in your hand, then press it between your palms to flatten it. Place the little caramel disc on an upside down whoopie pie and then place a right-side up whoopie pie on top to make a little sandwich. Repeat until you use up all the whoopie pies or all of the caramel. The assembled whoopie pies can be stored in an airtight container for 3 days.
Hahaha, thanks lady! Yes, I agree that the food alone is definitely what makes the super bowl worth watching.
I was just admiring the combination of flavors you're presenting when you slipped in the fact that these are made in 49ers colors. Mind=blown. These are gorgeous! And they're so cakey! Whoopie pies have to be cakey. I love football, but I get over-saturated around Super Bowl time...all I hear about are the ads and Beyonce and chicken wings...ugh! I'm rooting for the Ravens today because they beat the Patriots last week, and I HATE the Patriots. But I'm pretty sure the 49ers will win. That's all right, I guess. I'll just eat some of these to get over it.
These do look incredible and I will definitely be attempting them. Can I just ask how many this recipe makes please?
How many whoopie pies does this recipe make?
It makes about 16 whoopie pies :)
Hey, I made these today and they are DELICIOUS! I did have a little trouble with the caramel. Mine looked like it had the texture of undissolved sugar - I think my cream curdled slightly. But it tasted delicious! Maybe I added it too fast...I also did not notice it said to use the cream at room temperature. Still, I could eat tons of that caramel all by itself.
I did alter the recipe a bit. I wasn't sure what texture the caramel was supposed to be. Does yours get chewy when you put it in the fridge? I have front teeth that are bonded, so can't eat sticky, chewy caramel. I ended up keeping the caramel out at room temperature, then made a Cool Whip frosting and added half the caramel to that. Then I spread a thin layer of the still somewhat liquid caramel on one half of the whoopie pie, then added a generous spoonful of my Cool Whip frosting. YUM!
And my caramel didn't get sticky when I put it in the fridge, just a bit hard. You can easily mold it with your hands into the caramel discs without it sticking to you, I think the fat from the cream and the fact that a lot of the moisture has been boiled away keep it from sticking to things too much. So it wouldn't be a problem to eat with bonded front teeth, I have a metal retainer bar glued onto the backs of my top and bottom front teeth and I had no problem with it :)
Well okay, maybe I didn't mess up the caramel then. I know it sure is delicious! Good to know that the refrigeration doesn't make it too hard or sticky. Mom and I had fun licking the pan. ; )
Add comment
Enter your email address:
Side Project: Make Your Own Succulent Terrarium & ...
Review this recipe