
Chocolate Cream Pie
By CheeseDiva
 1 Picture
Ingredients
- 16 tbsp. unsalted butter, cut into 1/2" cubes and chilled, plus more for pie plate
- 1/4 cup packed light brown sugar
- 1 (9-oz.) package chocolate wafers, such as Nabisco, finely ground (about 2 1/4 cups)
- 3 1/2 cups half-and-half
- 2/3 cup plus 2 tbsp. sugar
- 1/4 cup cornstarch
- 9 egg yolks 2 oz. unsweetened chocolate, finely chopped
- 2 1/2 tsp. vanilla extract
- 2 cups heavy cream
- Dark chocolate, for garnish
Details
Servings 8
Adapted from saveur.com
Preparation
Step 1
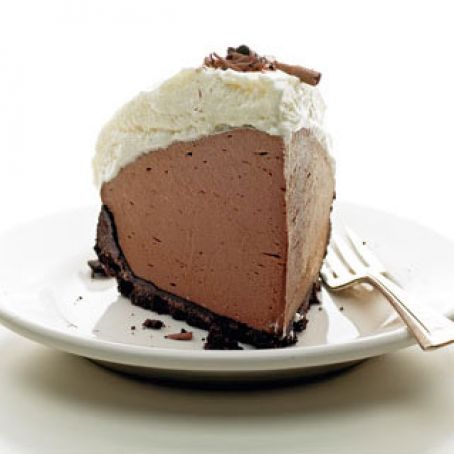
A crunchy crust and pudding-like filling make this chocolate cream pie a standout.
1. Heat oven to 375°. Grease bottom and sides of a 9" glass pie plate with butter; set aside. Heat 8 tbsp. butter and brown sugar in a 1-qt. saucepan until sugar dissolves. Transfer butter mixture to a medium bowl; stir in ground wafers. Transfer mixture to pie plate; press into bottom and sides, using the bottom of a measuring cup to compress crust. Refrigerate for 20 minutes. Bake until set, about 15 minutes; let cool.
2. Heat half-and-half in a 4-qt. saucepan over medium-high heat until it just begins to simmer; remove pan from heat. In a large bowl, whisk together &frac23 cup sugar and cornstarch; add egg yolks and whisk until smooth. Drizzle half-and-half into egg yolk mixture, whisking constantly, until smooth. Return mixture to saucepan; heat over medium heat. Cook, stirring often, until bubbles rise to the surface and mixture is very thick, 3–4 minutes. Remove pan from heat and add remaining butter and chocolates in small batches, whisking until smooth; stir in 1½ tsp. vanilla. Set a sieve over a medium bowl and strain chocolate mixture. Cover with plastic wrap, pressing plastic onto surface; refrigerate until set, about 4 hours.
3. Remove plastic wrap from chocolate filling and, using a rubber spatula, stir mixture until smooth. Spoon mixture into reserved crust, forming a dome, and smooth surface with the spatula. In a large bowl, whisk remaining sugar, remaining vanilla, and heavy cream until stiff peaks form; spread on top of filling, forming a dome. Using a peeler, shave some of the dark chocolate onto top of pie. Keep refrigerated until ready to serve.
Also tried mixing the whipped cream into the filling and then freezing it the pie. Let it sit out for at least 15 minutes before trying to cut into it.
Absolutely lovely. The only change that I made was that I stabilized the whipped cream before topping the pie. (Not sure why others had issues with the filling - I followed the instructions as written and had no separation problems. Are you perhaps adding the butter too fast? After adding in both chocolates and whisking until smooth, I just cut the stick of butter into roughly eight pieces, then added 3 or so at a time and whisked them into the filling.
i didn't have any problems with the butter separating but i had the custard very thick when i stirred it in, there was no way it could float to the top; maybe that's the trick?
The cooking time on the crust should be adjusted to 10 minutes or it does get too hard. I've modified the recipe slightly (adding some instant espresso to add dimension to the chocolate) and reviewed the recipe to add some tips for making the pudding at http://bit.ly/9IPEkn
This pie was delicious and worked perfectly. The filing was very creamy. did not have 4hrs to chill - placed in several small bowls in freezer for 30 min, then in fridge 1 hr before placing in crust and topping with whipped cream.
In the midst of letting the filling set. Mine didn't get real thick, but that may be because it looked like it was about to curdle and freaked me out so I pulled it from heat after about 2 minutes. I have a range I've disliked since we got it. I couldn't find chocolate wafers either, but used chocolate Goldfish from Peppridge Farms instead. Seamed to work okay.
This pie was outstanding! I used Scharfenberger chocolates for the filling and the pie had the perfect chocolate flavor and wasn't too sweet. I skipped the sieve step but the filling was still silky and smooth. I will definitely make this pie again.
I followed the recipe to the letter, and it turned out wonderful! It has been requested by my family a few more times and I am getting ready to make it again. It was simply delicious!
I have also looked in vain for the good old Nabisco chocolate wafer cookies. Are they now another thing of the past? Used to be available everywhere to make that odd whipped cream and wafer frozen dessert on the package. I am dying to make this pie - I think the oreos or chocolate graham crackers would work just fine.
I made this earlier this week for family, and I'm glad I gave it a trial run. (BTW, the Nabisco chocolate wafers are with the ice cream toppings at one of our local supermarket chains). I followed instructions to the letter, and it came together without a hitch, except for one thing. I added a tsp. of instant espresso to up the complexity, and I didn't think I could taste it, but my non-coffee-drinking daughter could taste it. I'll add another half teaspoon when I make it tonight. When I whipped the cream I didn't whip it stiffly enough, as per the instructions said, because it started to slide off the edges. It was very hot that day, but the a.c. was on. I refrigerated the filling for 6 hrs., as well as the baked shell, but I think it needed overnight because when I served it, it hadn't set up well at all. When I looked at what was left several hours later, it was nicely set up. So when I serve it to our wine and food friends tomorrow night it should look better. This is very good, very creamy, very rich. But it's not the intense chocolate taste those of us who are chocoholics crave. But it's undeniably yummy. Judy from Overland Park, KS.
The filling was much easier to make than I had anticipated. I made sure to have all the ingredients and bowls ready to go. After reading some of the reviews, I made sure to bring my custard to a thick consistency and added the chocolate and butter in turns. No separation problems - just the silky, smooth chocolate-y goodness.
I will absolutely makes this again.
Review this recipe