
Strawberry Cake w/ Chocolate Ganache
 1 Picture
Ingredients
- 2 cups Water
- 2 cups Granulated Sugar
- 1 cup fresh strawberries roughly cut up or even smashed
- 8 extra large eggs
- 8 ounces Granulated Sugar
- 8 ounces all purpose flour
- 4 ounces egg white
- 10 ounces Granulated Sugar
- 1 pound Unsalted Butter
- 1/2 cup strawberry preserves
- 2 teaspoons Vanilla Extract
- 1/8 teaspoon kosher salt
- 1 tablespoon crushed freeze dried strawberries optional
- 5 ounces dark chocolate chopped into small pieces
- 5 ounces heavy cream
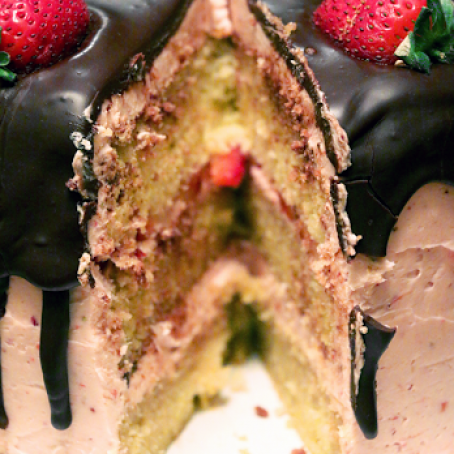
- 10-12 thinly sliced strawberries for layering in the cake
- 4 halved strawberries for decorating the top
Details
Servings 10
Adapted from mylifewithfood.com
Preparation
Step 1
Strawberry Syrup
Take a medium sized pot. Get all your ingredients for the syrup and put them in said pot. Give it a quick stir. Put it on your stove, crank up the heat and bring it all to a boil. Turn the heat off and let it cool.
Genoise (Sponge Cake)
Preheat your oven to 350ºF.
Take the bowl of a stand mixer and weigh in the eggs and sugar. Attach the whisk, put it all into position and turn the speed all the way up. Set a timer for 10 minutes.
During those 10 minutes, weigh out the flour into a bowl and get a sieve or sifter handy. It's also a good time to get your trays set up.
When your timer goes off, turn the speed of your mixer down to medium and set the timer for another 10 minutes.
You now have 10 minutes to do something. Pay some bills, read an article, do some online shopping, pour yourself a glass of wine. The possibilities are nearly endless.
Once your timer goes off again, stop the mixer. Take the bowl off and sift the flour over. With a spatula, quickly, but gently, fold the flour into the mixture trying not to deflate it. It will shrink in size a bit because it's impossible to not deflate it a little.
Divide the batter as evenly as you can among three 7-inch cake rings/cake pans. If you're using rings, don't grease them. If you're using a cake pan that doesn't have a removable bottom, spray the bottom only, and put a circle of parchment there and then spray the top of the parchment only. You don't want to grease the sides so that the batter has something to crawl up and latch onto as it rises. If it's greased, it will have trouble and won't be as tall.
Slide the battered trays into the oven and bake for about 25-30 minutes, rotating halfway through. You want the cakes to spring back when touched in the center and they will be a light golden brown. When in doubt, use the good ol toothpick method. If it comes out clean or with a couple crumbs on it, then the cake is done. I have a habit of setting the timer for 10 minutes, rotating, another 10, and then I check the cake in 5 minute intervals.
Let the cakes cool for a bit in the pans and then remove and cool completely on a rack. If they aren't coming out with ease, run a thin spatula or paring knife around the inside between the cake and the vessel. This will help loosen it all up.
You can make the cake well ahead of time. When they are cooled completely, wrap tightly in plastic and store in the freezer for up to a month. If you plan on using the next day or two, you can leave them wrapped out on the counter.
Strawberry Buttercream
I find it best to start with having a few things at the ready: an instant thermometer, a spatula, the bowl of your stand mixer and whisk attachement.
First up, you want to grab a small pot. In that pot, scale in your egg whites and sugar. Put it on your stove and turn the heat to medium low. Use the spatula to stir it constantly. If you need to step away just move the pot off the heat. Otherwise, keep moving the eggs and sugar around. As it becomes more fluid, take the temperature of the mixture. Once it reaches 160ºF, turn the heat off and pour it ino the mixer bowl. Scrape every last bit out.
Attach the whisk and turn the speed up to high. It will be noisy. But it will be worth it in the end. Keep whisking it on high until it becomes thick and turns white. Touch the bottom of the bowl. If it feels hot, let it continue to mix. When it's only slightly warm, that's when you can start adding in your butter.
With the mixer running on high, add in the butter. Not all of it at once, but a few chunks at a time. Let it mix in all the way before adding in the next batch.
When you get near the end of adding in the butter, the buttercream will start to look curdled. This is fine. This is expected. Don't stop. Don't worry. Keep mixing. That means it's almost done. Ignore it. Do a shot. When you come back, you'll soon realize it was just a passing moment and that everything is fine and you freaked out for no reason at all.
Once all the butter is incorporated, stop the mixer and scrape down the sides. Turn the mixer back on and whip it up again for about a minute.
If you feel confident, you can go ahead and add everything else in with the mixer running. You can turn it down to low too. Or you can turn it off, add it all in and then turn the mixer on. Any way will work.
Let it all mix and get fully combined. That's it. See how easy? The hard part will be to not snack on it all before you get to frosting your cake.
Dark Chocolate Ganache
This is really something you don't want to make until your cake is all layered and buttercreamed and finished. However, you CAN make it ahead of time if you want. But you'll still have to microwave it slowly to melt it over heat it over a double boiler. So in the end, it's just as much work, if not more.
Measure out your chocolate in a bowl.
Weigh out the heavy cream into a small pot. Heat it on the stove over medium high heat.
Heating heavy cream is an interesting process. It's not hard and depending on how much you're heating, it can take a while. But once it begins to get hot, it happens quickly. If you're not careful or watchful, it will quickly boil up and over the sides of your pot and you'll have a giant mess on your hands.
When the heavy cream beings to bubble around the edges of the pot, it's ready. Pour it over the chocolate in the bowl. Let it sit for about a minute.
With a spatula, slowly stir the cream and chocolate together until smooth.
Assembly/Finishing
The first step is preparing your cake layers. You want them to all be even. Use a serrated knife to shave off any domed tops and get each layer as even as you can. It's possible you won't have to do anything. There is also no set rule that it has to be three layers. You can cut each cake in half to make a total of six. Just adjust the amounts of buttercream spread on top of each layer and add another layer of fresh strawberries.
Whatever you plan on using to serve your cake on, grab it and line it with small pieces of parchment paper to cover the edges of the plate. These will catch any mess and you can pull out easily once complete. If you have one big piece, it will be much harder to take it all off in the end. Put one layer of cake on top of the parchment shielded plate.
Remember that syrup? We're going to use it now. Grab a pastry brush and use it to brush the syrup on to your first cake layer. Soak it all over. It will take a lot more liquid than you think. If you see liquid soaking out of the bottom of the cake, then you've gone too far (or it's just right…depends on how you look at it). Otherwise, just keep going. When you press down lightly on the cake, you'll want a little liquid to come up to the surface.
Scoop about 1/4 cup of buttercream on the take cake and spread it out evenly, going out to the sides of the cake. If the edges don't look amazing, don't worry. They are going to get covered up with more buttercream. But you want to be sure to go all the way out to the edge so you don't have any gaps in icing. That would be a real tragedy. A frostingless bite of cake. You might as well just eat a pie at that point.
Place another cake layer on top and repeat the whole soaking process.
Next, you are going to spread a very thin layer of buttercream over the cake layer. This is going to act as glue. All those sliced strawberries you have are going to get layered here. Make a mosaic out of them. It doesn't have to look perfect. But you want a nice even layer. Cut up pieces to fill in all the gaps.
Place the last layer of cake on top and do that whole soaking thing one last time. Finish off with a 1/4 cup of the buttercream, smoothing it out evenly. If you notice that your cake is starting to look domed, that just means that the layer of buttercream you put on much earlier wasn't as even as you thought. You can still fix it, luckily. Just spread a little extra buttercream on the edge of the layer to make it thicker than what's in the middle.
Next up you're going to spread the buttercream around the outside of the cake. Not a thick layer, but enough to coat the cake. Using an offset spatula will help greatly. Make sure it's fairly smooth and then put the cake in the fridge for at least an hour. You're going to use up the rest of the buttercream on the cake, but by putting the cake in the fridge, it will harden up the crumb coat and will make the final coating that much easier to go on. You can leave the buttercream for spreading out on the counter, just cover with plastic wrap so it doesn't get contaminated or eaten by random passerby.
After an hour, take the cake out and then spread the rest of the buttercream onto the cake. A nice thick even layer of pink buttery deliciousness. Use the same techniques as before. Then put it in the fridge or if you've got room, the freezer. Let it chill for at least an hour in the fridge or 30 minutes in the freezer.
When the time is about up, that's when you should make the chocolate ganache.
Grab your cake from whatever cold hiding place you gave it. Pour the warm ganache into a liquid measuring up (or something with a pour spot). Slowly pour the ganache over the cake. Don't pour it in just one spot. Move around the edges and into the center. Use an offset spatula or the back of a spoon to help spread the ganache out to the edges. Let it drip down the sides.
While the ganache is still soft, decorate the top of the cake with fresh strawberries. If you somehow how leftover buttercream, you can pipe that on top or even around the base of the cake.
Remove the pieces of parchment and let the ganache fully set. The cake will store well in the fridge, but it's best at room temperature. So take it out at least an hour before you're ready to slice into it. Or just leave it out until your ready to eat it. But since you've got strawberries, don't put it in the freezer. When it thaws, the strawberries will get all sad and bleed out all their yummy juices and leave you with a big, soggy mess on your hands.
Review this recipe