
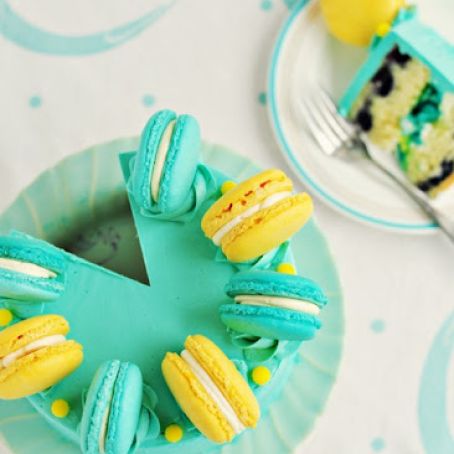
Lemon-Blueberry Macaron Delight Cake
 1 Picture
Ingredients
- Macarons:
- 1 batch Lemon-Blueberry Cake (see below) split among four 6″ round cake pans (you can split the recipe in 1/2 for one 6″ round 2-layer cake)
- 1 batch Lemon Curd (this will fill cake and Macarons)
- Double-batch Swiss Meringue Buttercream (this will frost cake and fill Macarons)
- 2 batches French Macarons, 1 tinted Teal and 1 tinted Egg Yellow and filled with a small dollop of Lemon Curd inside a teaspoon of the buttercream (piping the buttercream around the inner perimeter of the macaron shell works best)
- 1 cup confectioners’ sugar
- 3/4 cup almond flour
- 2 egg whites, at room temperature
- Pinch of cream of tartar
- 1/4 cup superfine sugar
- Gel food coloring (optional)
- Lemon Blueberry Cake:
- 2 cups plus 6 tablespoons all-purpose flour
- 2 teaspoons baking powder
- 1 teaspoon salt
- 3 cups fresh blueberries
- 1/2 cup sour cream
- 1/2 cup whole milk
- 2 teaspoons vanilla extract
- 3/4 teaspoon pure lemon extract
- 1 teaspoon lemon zest
- 1 cup (2 sticks) unsalted butter, softened about 20 minutes out of refrigerator
- 1 1/2 cups white sugar
- 4 large eggs
- Lemon Curd:
- 4 lemons (or 6 Meyer lemons), or 2 oranges, or 5 limes (or 8 Key Limes), preferably organic
- 2 whole eggs plus 4 egg yolks
- 1 cup sugar (200 grams) (7 ounces)
- 4 tablespoons (60 grams) (2 ounces) unsalted butter, at room temperature and cut into small even cubes
- Swiss Meringue Buttercream:
- 5 large fresh egg whites (30g each–total 150g)
- 1 1/4 cup (250 g) superfine granulated sugar
- 3/4 pound (3 sticks, 340 g) unsalted butter, softened, cut into cubes
- 2 teaspoons (10 mL) pure vanilla extract
- Pinch of salt
Details
Servings 12
Adapted from sweetapolita.com
Preparation
Step 1
Macarons:
1. Line two baking sheets with parchment paper. Fit a pastry bag with a 3/4-inch plain tip (or use a zip-top plastic bag without a tip and snip the corner after filling).
2. Add the confectioners’ sugar and almond flour to the bowl of a food processor and pulse until well combined.
3. Using a hand-mixer, beat the egg whites at medium speed until frothy. Stop the mixer and add the cream of tartar. Start the mixer again and continue beating at medium speed until soft peaks form. Reduce the speed to low and gradually add the superfine sugar, 1 tablespoon at a time. Increase the speed to high, and beat until stiff peaks form. The finished meringue should have a smooth, shiny appearance.
4. Sift the almond flour mixture over the egg whites and fold together with a rubber spatula until just mixed. At this point you may add a drop or two of food coloring to tint the batter. Continue to fold the mixture until it has loosened considerably and falls in a ribbon from the spatula.
5. Transfer the batter to the pastry bag.
6. Pipe 1 1/2-inch rounds approximately 1 inch apart on the prepared baking sheets. As you pipe, drag the pastry tip to the side of the rounds to avoid forming peaks. The piped rounds will spread slightly.
7. Tap the bottom of each sheet on the work surface to release trapped air bubbles.
8. Let stand at room temperature for 15-30 minutes to dry. Preheat the oven to 375°F.
9. Just before putting the pans in the oven, reduce the oven temperature to 325°F. Bake for 10 minutes, rotating the pans halfway through the baking time, until the macaron are puffed and have formed the frill, or foot, around the bottom edge of the cookie. The feet may may deflate slightly after the pan is removed from the oven–this is normal and should be expected.
10. Let the macaron shells cool completely on the baking sheets. Carefully peel them away from the parchment paper.
11. Select two same-size macaron shells to sandwich together with 1 teaspoon filling.
Tips
If you don’t have time to let your egg whites come to room temperature, you can place them in a microwavable bowl and heat them in microwave for 10 to 15 seconds. Microwaves vary in strength, so be extra careful to not cook the egg whites.
Macaron shells can be frozen for up to 3 months. Thaw completely at room temperature before filling.
Use insulated baking pans (such as T-Fal Air-Bake) or use an additional cookie sheet under the pan of piped macarons to ensure the shells do not over-bake.
Sweetapolita’s Macaron Notes: For the macarons, you can grind your own almond flour using raw almonds in the food processor until very fine. It’s also a bit more affordable, as almond flour is $$$.
To colour my macarons, I added the gel colour into the meringue, before the flour mixture was added, so I could play around with adding more drops without risking over-mixing my batter. Once I was happy with the colour, I went ahead with adding the almond flour mixture. You can fill macarons with pretty much anything you can dream of–ready-made or not, such as jams, buttercream, curd, ganache, frosting, Nutella, etc. You really can’t go wrong!
Filling macarons is the perfect solution to small amounts of leftover fillings and frosting from cake and cupcakes projects–you can freeze most in small containers, and thaw when needed.
I found the filled macarons increased in awesomeness after sitting in an airtight container in refrigerator for at least a day.
Assembly of the cake:
1. Trim any doming or top crust and side crust from cake layers using a very sharp serrated knife (I use the Mac Bread Knife for all of my cake trimming, splitting, etc.).
2. Use a cake turntable for filling, frosting and decorating, if a possible. Place a small dollop of frosting in the center of a cake plate or 6″ round thin foil-covered cake board, and place the bottom cake layer on top, top side up (face up).
3. Pipe a dam (a rim around the top perimeter of the cake layer) of buttercream around the cake layer using a large round Pastry Tip
fitted inside a Decorating Bag. Then pipe another smaller circle of buttercream a few inches toward the center. Spoon lemon curd into the open spaces and spread evenly with a small offset palette knife, taking care to keep the curd within the dam (otherwise it will ooze out of the sides of the cake). Gently place 5 macaron shells atop the filling. Place the 2nd cake layer, face down, on top.
4. Tint remaining buttercream teal green, and put a generous scoop of teal buttercream on top, spreading evenly with a small offset palette knife and working your way down the sides until you have a thin layer of frosting over the entire cake (crumb-coat). Chill until set, about 30 minutes.
5. Remove from refrigerator and repeat step 4, but this time using a thicker layer of buttercream and creating a smooth finish. (You can watch me do this on video here).
6. For the top of the cake, place an open star decorating tip (I used 1M) in a Decorating Bag filled with about 1 cup of the buttercream, and pipe 8 small swirls, evenly spaced. Top each swirl with macarons in alternating colours (or your choice), and finish with sugar pearls (if desired).
Store finished cake covered in refrigerator (due to the Lemon Curd filling), but serve at room temperature (you can remove from refrigerator a few hours ahead of serving). Sweetapolita’s Notes
Because Swiss Meringue Buttercream and Lemon Curd both take a little longer to make than some other fillings/frosting, I recommend making both ahead of time, if possible. They freeze well, and the buttercream can be simply brought to room temperature the night before you need it. The curd can basically be used straight from the freezer. If you go ahead and make all of the components in one day, there’s a good chance you will be cursing my name at random throughout the day. But even if you do go this route, it will still be worth it.
I also recommend making and filling the macarons about 2 days ahead of time and keep them in the refrigerator in an airtight container–they really do taste better after sitting!
You can bake the cake layers the day before you need them, and keep them at room temperature wrapped tightly in plastic wrap.
I baked two 6-inch round cakes (1 for photographing and 1 for gifting), but you can divide the cake and filling quantities in half if you want to create a single 6-inch cake (serves 8).
I hope you find as much joy in making, sharing and enjoying macarons (and macaron cakes) as I did. Stay tuned for more macaron love! ♥
Lemon-Blueberry Cake:
Preheat oven to 350°F. Prepare three 8″ round cake pans with parchment paper, butter and flour. Sift dry ingredients into medium bowl. Transfer 1 tablespoon flour mixture to larger bowl. Add fresh blueberries and toss to coat them with flour. Set remaining flour mixture and blueberries aside.
Stir whole milk, sour cream, vanilla extract, lemon extract and lemon zest in small bowl. In the bowl of a stand mixer, cream butter and sugar, until pale yellow and very fluffy, about 5 minutes. Beat in eggs one at a time, until well combined. Mix in flour mixture alternately with milk mixture, starting and ending with flour mixture. Stir until just combined. Gently fold in blueberries. Divide batter equally among 8″ round pans.
Bake cakes until toothpick inserted into centre comes out clean, about 25 minutes. Cool cakes in pans on racks for about 10 minutes, then invert onto racks until completely cool.
* Lemon Curd:
1. Wash citrus really well (with a bristled brush under cold water) and using a Zester, remove all of the coloured portion of the peel from the fruit (not the white pith–it’s bitter!) into a bowl or onto a piece of wax paper. Rotate fruit as necessary to get as much of the zest off. Repeat until you have 2 teaspoons (30 mL) of the zest, and set aside.
2. Slice the citrus in half crosswise (I find room temperature citrus is best for juicing) using a sharp knife, and extract as much of the juice as you can using a citrus reamer, or I use a small Citrus Juicer. Just be sure to catch all of the juice in a bowl and to completely strain the seeds before using. Repeat the juicing until you have 2/3 cup (5 fl oz/160 mL) of the strained juice.
3. Get your double boiler ready by filling a saucepan with 1″ of water, then placing a metal bowl on top of the saucepan. You will need to ensure the bowl fits snugly into the top of the saucepan and that the bottom of the bowl doesn’t touch the water (important, or your eggs will cook!). You can now remove the bowl and continue with making the curd.
4. Whisk the juice, whole eggs, egg yolks and sugar in the bowl until smooth. Add the butter cubes to the bowl, but don’t stir.
5. Heat the water in the saucepan over low heat until it simmers (not boils) and place the bowl atop the rim. Stirring gently, but constantly, using heatproof spatula or wooden spoon, cook until the curd has thickened and all of the butter has melted and is incorporated, about 10 minutes (this can vary). To test if the curd is thick enough, remove the spatula or spoon from the curd and check that it’s coated.
6. Strain the curd over a bowl using a fine-mesh sieve and then stir in the zest. Cover with plastic wrap pressed directly against the curd (to prevent a skin from forming) and chill for at least 3 hours (I like to chill it overnight). It also thickens up a bit more while chilling.
*Swiss Meringue Buttercream:
Wipe the bowl of an electric mixer with paper towel and lemon juice, to remove any trace of grease. Add egg whites and sugar, and simmer over a pot of water (not boiling), whisking constantly but gently, until temperature reaches 160°F, or if you don’t have a candy thermometer, until the sugar has completely dissolved and the egg whites are hot.
With whisk attachment of mixer, begin to whip until the meringue is thick, glossy, and the bottom of the bowl feels neutral to the touch (this can take up to 10 minutes or so). Switch over to paddle attachment and, with mixer on low speed, add softened butter in chunks until incorporated, and mix until it has reached a silky smooth texture (if curdles, keep mixing and it will come back to smooth). Add vanilla and salt, continuing to beat on low speed until well combined. You can also add a wide variety of flavourings, extracts, and more, but always add the vanilla first, as it brings out the true taste of the other flavours.
Notes:
Keep in airtight container in refrigerator for up to one week, leaving out at room temperature when needed, re-whipping in mixer for 5 minutes.
Can freeze for up to 6-8 weeks. To thaw, place on counter overnight, and rewhip for 5 minutes with paddle attachment in an electric mixer.
Makes approximately 5 cups of buttercream.
For Chocolate Buttercream, add 150 g (3/4 cup) melted bittersweet Belgian chocolate (the best you can get–I use Callebaut) to Vanilla Swiss Meringue Buttercream and beat until incorporated.
For Strawberry Buttercream, add strawberry puree to taste, OR a few drops of LorAnn Strawberry Flavor Oil.
Review this recipe