
Glaze Icing Recipe
 1 Picture
Ingredients
- 4 cups powdered sugar
- 1 tablespoon corn syrup
- 2 tablespoons water (more may be needed)
- 1 teaspoon vanilla extract ( or flavor of your choice)
- a few drops of food coloring (I use Americolor gel colors)
Details
Servings 1
Adapted from createdby-diane.com
Preparation
Step 1
Mix the powdered sugar along with corn syrup and water and extract until it’s smooth and creamy.
The glaze worked best when it’s was not runny. I ran my spatula through the icing and drew a line, it too about 5 seconds for it to fill back in where I drew the line. Adjust the water so it’s fluid, but not runny.
Extract and food coloring are both in liquid/gel form, so adjust accordingly if you add more, you may need more powdered sugar.
I placed the icing in an oval dish and strapped a lollipop stick with a rubber band going under the dish attaching to each side of the stick.
I love how pretty cookies that have been piped on look, but I’m dealing with some shoulder pain right now so, this is how I have be icing cookies. I was surprised how quickly it went, I finished dozens of cookies in a matter of minutes.
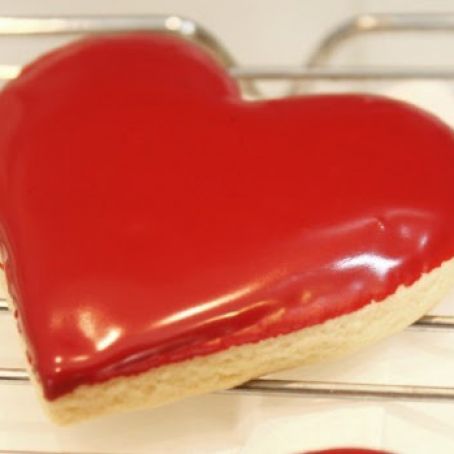
I did not scrape the icing off of the cookie. I dipped the top edge of the cookies into the icing and then ran the majority of the excess of the icing off by holding the cookie about 1/4 inch away from the lollipop stick, as I moved the cookie from where I dipped it to the other side of the dish. Then I turned the cookies over onto a drying rack. After icing these, I realized if the cookies were just a little bit thicker, my fingers wouldn’t get in the icing. The cookies I did with the red icing were just a bit thicker and it worked, no icing on my fingers!
The lollipop stick helps remove the majority of the excess icing without having to wait for the excess to drip off without messing up the icing you want to remain on the cookie. It also allows for an even layer of icing to remain on the cookie, and when turning the cookies upright, no drips went over the edges of the cookies (iced in red, as that was the correct consistency of icing) the pink was too runny and ran over the edges-that is why I’m showing you both. Hopefully the photos will help you to achieve the consistency needed for smooth finished cookies.
The pink icing was the first batch I had tried to dip into icing and it was a little bit runny, so some areas ran over the edge of these Chocolate Cut-out Cookie which by the way are Super-Delicious, no wonder they are called the End All for Chocolate Cookies. I used special dark chocolate cocoa, that is why they are extra dark. The recipe if from Lilaloa. The second time I tried dipping the cookies was the red icing in the beginning of this post, I made the glaze icing a bit thicker and it worked out great. So a little trial and error or the icing allowed me to see the difference.
* Cookies that are a little thicker (like the ones on top iced in red) were less messy as there was more cookie to grab onto and my fingers didn’t need to touch the icing.
**Glaze icing dries hard, if you let them icing air dry for 12 hours before stacking cookies or packaging them.
*** no piping the edge required
****Will work with Royal Icing as well
*How do I get red icing RED, I use Americolor Food Coloring.
Review this recipe