
How to Make Your Own Egg-Painting Brushes
By pattie_d
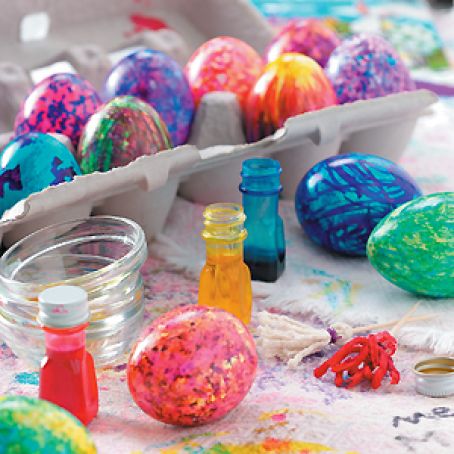
An Egg-Cellent Easter Egg Dying Party! Decorating Easter eggs becomes a special family tradition. One tradition that always brought my brothers and me to the table when we were young was the Easter egg-decorating parties my parents would host for our family and friends.
We all had our own personalized egg mats with our names on them, complete with healthy stains from parties past. My grandmother and I would make dozens of dye brushes fashioned from toothpicks and kitchen string—these were the trick when it came to our unique style of egg decorating. (Learn how to make your own dye brush.)
My father had serious rules for the party, and if you were a first-time egg decorator, you were subject to endless teasing. He never considered an egg to be finished if it still had white showing. He thought it a cop-out if someone used the cotton swabs that came with the egg dye. And anyone who spilled a bottle of dye owed everyone at the table a quarter.
Once everyone arrived, we would distribute the brushes. We were very particular about the paint we used: Only Doc Hinkle’s dyes by the John Wright Company were acceptable. And we never employed the traditional dip or soak techniques; we applied the vibrant colors with our custom toothpick brushes, creating mosaics of color unlike any Easter eggs I have seen anywhere else.
Mom always made sure we painted onto piping-hot eggs, straight from the boiling water. While the hot eggs could be difficult to handle, the resulting shiny bright colors were worth the temporary discomfort.
The egg-painting parties were always special times full of sharing and laughter. So special that, as an adult, I brought the tradition with me when I moved my own family to Wisconsin several years ago.
We still order the dyes from Doc Hinkle’s and host our own egg-dyeing parties every year for all our friends. The best part? The stories told and the personalities revealed while each person shares his or her inner artist. (Second-best part: making tasty stuff—like deviled eggs—with the leftovers!)
Find out more about Doc Hinkle’s egg dyes, by visiting their Web site
 1 Picture
Ingredients
- 100 % cotton twine
- Round toothpicks
- Thread
Details
Adapted from tasteofhome.com
Preparation
Step 1
Cut approximately 12 inches of twine from the ball.
Wrap twine loosely around your index and middle fingers 4-5 times.
Carefully remove the spooled twine from your fingers, making sure to keep the loops intact.
Insert toothpick halfway into one end of the looped twine.
To secure the looped twine and toothpick, wrap thread tightly around the end where toothpick was inserted. Tie off thread.
Cut open the loops at the other end of the brush; trim ends to make them even.
Review this recipe