
Susan's Farmhouse White Sandwich Bread
By RoketJSquerl
 1 Picture
Ingredients
- 4 Cups All-purpose Flour, 1 Lb, 4 Ounces-566 Grams
- 2 Tablespoons Instant Yeast, 22 Grams
- 2 Tablespoons Granulated Sugar, 28 Grams
- 2 Tablespoons Canola Oil, 30 Grams
- 4 Cups Warm Milk (or Water), 2 Lbs-908 Grams
- 6 Cups Bread Flour, 1 Lb, 13-1/8 Ounces-825 Grams
- 1 1/2 Tablespoons Salt, 3/4 Ounce-22 Grams
Details
Servings 3
Preparation
Step 1
In a very large bowl, stir together the all-purpose flour, yeast, and sugar (I use a wooden spoon). Make a small well in the middle of the flour mixture and pour in the canola oil and then the milk. Mix well, then continue to stir vigorously, slowly adding 1 cup of the bread flour at a time, until you've added about 5 cups, or until you have a soft, slightly sticky dough; this should take several minutes.
Turn the dough out onto a floured surface and knead for about 6 or 7 minutes, adding more flour as necessary to keep the dough from sticking to your hands or the work surface.
Place the mixing bowl over the dough, and let it rest for 20 minutes. This rest period is called the autolyse.
Remove the bowl, flatten out the dough with your hands, and sprinkle about half of the salt over it. Begin kneading the salt into the dough. After a few turns, sprinkle on the rest of the salt and continue to knead for 5 to 7 minutes, until the salt is completely incorporated and the dough is soft and smooth.
Sprinkle flour in the dough bowl, place the dough in it, liberally dust it with flour, and cover it with a damp tea towel (not terry cloth, as it will shed lint on your dough). Or put it in a straight sided plastic container with a snap-on lid and mark the spot on the container that the dough will reach when it has doubled in volume.
Set it somewhere that is preferably between 70F and 78F for 60 to 90 minutes. Ideally, the dough should also be between 70F and 78F. It's easy to check the temperature of your dough and ingredients with an inexpensive instant read thermometer.
When the dough is ready to be shaped, you should be able to push a floured finger deep into it and leave an indentation that doesn't spring back. Unless your dough is rising in a straight-sided container, it can be difficult to judge whether it has "doubled in size" which is the guideline most recipes use. I find the finger poking method to be more reliable, though lately I've been letting all my doughs rise in plastic containers.
Shaping and final rise (proof)
Turn the risen dough out onto a lightly floured work surface, flattening gently with your hands to break up any large air bubbles. Divide the dough into three equal pieces.
Shape the dough into loaves and dust the tops with flour. There are dozens of ways to do this; for the way I like to do it, check out this post on how to shape dough into sandwich loaves. Place loaves seam side down in greased loaf pans. I like my sandwich breads to be tall, so I use smaller loaf pans. I can't say enough good things about these commercial loaf pans from Chicago Metallic. They call this size a 1-pound loaf pan, and it measures 8-1/2 inches x 4-1/2 inches and is just under 3 inches tall. For the price of a few loaves of bread, they're definitely worth the investment—and with a 25-year warranty. Chicago Metallic also makes this larger 1-1/2 pound size pan for those of you who prefer a wider, shorter loaf.
Cover the loaves with a damp tea towel and let them rise for 45 to 60 minutes. When you lightly poke the dough with a floured finger it should spring back just a little.
If you let the loaves rise too long, they may not have enough energy left to rise once they're in the oven--and they may even collapse. I was always so afraid this would happen that for years I unknowingly under-proofed my loaves of Farmhouse White.
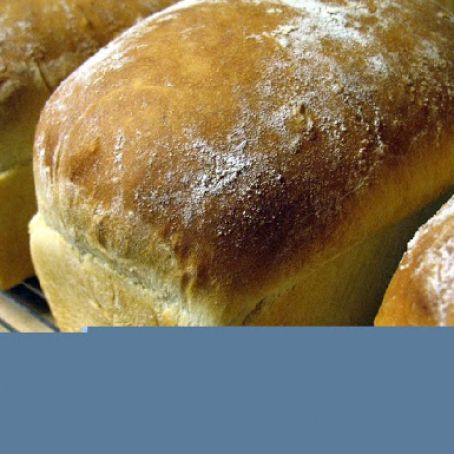
While the bread was still delicious, you can see that the dough had so much 'oven spring' that it basically blew apart the side of the loaf. I finally started letting the loaves rise a little longer and was rewarded with the more evenly shaped and visually appealing bread that you see in the top two photos.
Bake at 375 degrees* for 35 minutes or until the loaves are golden brown and the bottoms sound hollow if tapped. Remove immediately from pans and let cool on a wire rack. Try to wait at least 40 minutes before cutting into a loaf. Store at room temperature or freeze in zipper freezer bags. Make sure loaves are completely cooled before sealing in bags.
Update: I've started baking all of my pan loaves on a heated baking stone (in order to simulate the ceramic hearth deck of my 7-foot wide commercial deck oven in the someday-bread-bakery-to-be), and the results have been wonderful. The bottoms of the loaves are nice and evenly brown, and I think that extra initial burst of heat makes the loaves end up even taller. Just like with pizzas and freeform loaves, you need to preheat your stone so that it's nice and hot when you put the bread in. Since Farmhouse White bakes at just 375 degrees, 30 to 45 minutes is usually enough.
Review this recipe