
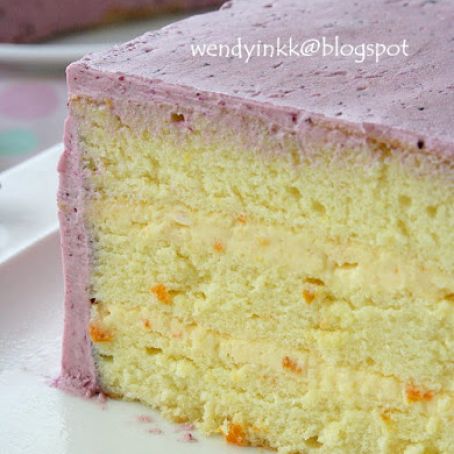
CAKE - Kumquat, Orange and Blueberry Cake
By Aemelia
 1 Picture
Ingredients
- Yolk batter:
- 7 egg yolks
- 35 gm sugar
- 70 gm vegetable oil
- 70 gm orange juice
- 1 Tbsp orange zest
- 140 gm cake flour
- 1/2 tsp baking powder
- Meringue:
- 7 egg whites
- 70 gm sugar
- 1/2 tsp cream of tartar
- Kumquat Cream Cheese Filling:
- 10 kumquats
- 1/2 cup water or more
- 25 gm sugar or more (depending on the kumquat’ s taste)
- 125 gm cream cheese, room temperature
- 60 gm butter, slightly softened
- Blueberry Buttercream:
- 100 gm blueberries
- 1 Tbsp water
- 1 Tbsp sugar
- 2 Tbsp lemon juice
- 1.5 Portion of buttercream
- BUTTERCREAM:
- 60 gm egg white (about 2 large whites)
- 100 gm sugar
- 170 gm unsalted butter (taken out from fridge and cut into 10-12 small pieces just before you start to heat the egg whites)
Details
Adapted from wendyinkk.blogspot.com
Preparation
Step 1
CAKE:
1. Preheat oven at 160(fan)/180C. Prepare an 10 inch pan. Line the base only.
2. Prepare yolk batter. Combine all the wet ingredients + sugar + lemon zest. Sift cake flour + baking powder together and combine with everything until a smooth batter forms.
3. Prepare meringue. Beat egg whites with cream of tartar until soft peaks and beat in sugar gradually until stiff peaks form (hooked peak).
4. Prepare final batter. Fold ¼ of meringue into yolk batter until well combined. Repeat with another ¼. Pour the yolk batter into remaining meringue and fold until well combined (Fold not stir and it should look very foamy). Pour batter into prepared pan.
5. Bake the cake for 40-45 minutes or until done. Remove from oven and let the cake totally cool before removing cake from pan. (If it’s a springform pan, you can skip lining the base and then invert the pan to cool for better volume)
6. Slice cake into 3 slices and fill with kumquat cream cheese filling (recipe below). Cover and chill for 2 hours minimum.
7. Cut cake to preferred shape (in my case, elephant). Dollop some cream onto cake board (where you want to lay the cake pieces) and arrange the cake pieces onto it.
8. Chill the cake for another 30 minutes before frosting the whole cake (just to make sure the filling is properly set after being cut and revealed) with blueberry buttercream (recipe below)
Kumquat Cream Cheese Filling:
Do this step in advance. Half kumquats and remove seeds. Slice them thinly and place in a saucepan together with sugar and water (amount should cover the sliced kumquats nicely, if not, add more). Bring to a boil and lower heat to simmer until kumquats are soft. Blitz the kumquats together with the syrup until a coarse puree forms. Let it cool down. It should be at the consistency of ketchup. Cover with plastic wrap and chill in fridge, it will further thicken.
Beat cream cheese and butter until smooth. Beat in cold kumquat puree. Taste it. If not sweet enough, add some caster sugar and beat a while. Use this to fill cake.
Blueberry Buttercream:
Prepare the blueberry compote. Cook blueberries with water and sugar until they bleed. Lightly mash it with a fork. Let it cool down to warm and press the blueberries through a sieve to remove the skin. Mix the sieved compote with lemon juice, it will turn reddish. Discard the skins in the sieve.
Prepare blueberry buttercream. Prepare buttercream and at the end of the beating put in blueberry compote by the tablespoon, beating well after each addition before adding in the next spoon. Chill the cream for half an hour before use (it’s easier to frost with firm buttercream) Use this to frost cake.
BUTTERCREAM:
Method: (instructions are adapted to tropical weather and hand held mixer)
1. Put the sugar and egg whites in a large heatproof bowl over a saucepan of simmering water and whisk constantly, keeping the mixture over the heat, until it feels hot to the touch, about 3 minutes. The sugar should be dissolved, and the mixture will look like marshmallow cream.
(egg whites in buttercreams are safe for consumption once it reaches 65C, to know how much is 65C w/o a thermometer, just mix 250gm ice with 500ml boiling water. Stir the water gently and wait until all ice has melted, then feel the water. It is approximately there)
2. Pour the mixture into a bowl. Put the bowl into a basin of water. The water should feel cool, like tap water on a rainy day. Do not use very cold water, not icy water. Beat the meringue on medium speed until it cools and forms a thick shiny meringue, about 5 minutes.
3. Now add in add the butter, one tablespoon at a time, beating until smooth. Once all the butter is in, beat in the buttercream on medium-high speed until it is thick and very smooth, 6-10 minutes.
Important:
Temperature: If you have a room temperature and humidity like mine, try to add 3-4 pices of ice cubes into the water in step (3) when you add in the butter to prevent the whole mixture's temperature from going too high. The movement of the mixer will heat up the buttercream. Temperature plays an important role whether cream or soup will form. Too cold and the butter can't get fluffy, too hot and you'll get runny soupy cream.
Butter: It must be at 19-23C. Most recipes call for butter to be at room temperature. Yes. But that is non tropical room temperature. Our room temperature can be somewhere 28-37C. So, if you leave your butter to come to our room temperature, failure is not far from grasp. The butter should not be shiny. It should be matte in colour, and you will be able to hold it firmly with your fingers like what you see in the picture and soft enough to be dented thoughout with some pressure.
Eggs: Do not use pastuerized eggs. The egg whites won't melt the sugar. I saw this in one blog.. I forgot where.
**Additional notes on eggs : I have tried beating pastuerized egg whites for meringues before. It works. But I haven't tried making buttercream with it yet, as I prefer to go through the heating steps. You have to use 1/4 tsp cream of tartar with each egg white to ensure it whips up beautifully. Pastuerized egg whites are rather 'tightly' bound, so you must use lots of cream of tartar to 'loosen' it. It won't whip to the volume as regular egg whites, which is another reason for me not to use it. The brand I used is SafeEgg, different brands may differ.
Review this recipe