
Temper Chocolate w/o a Thermometer
By stancec44
Purchasing chocolate
When shopping for chocolate, bittersweet and semi-sweet aren't good terms to go by; try to find chocolate that is labeled with percentages instead. Alexandra likes to use a 70% Valrhona Guanaja chocolate (available at well-stocked culinary and candy-making shops or on Amazon) but any quality chocolate in the 60-70% range will do. If your only choices are bittersweet or semi-sweet, go with
The best form to purchase your chocolate in is in already tempered disks, also known as fèves. Store it in an airtight container in a dark place (not in the refrigerator) and avoid subjecting it to a wide fluctuation in temperatures, which will cause the chocolate to bloom.
Alexandra advises, "Your chocolate shouldn't have any added wax, just cocoa butter and solids, and sugar. The easiest chocolate to temper has additional cocoa butter added, it's a special kind of chocolate — called couverture in French — that's made for tempering and dipping. Don't use already manufactured chocolate bars as those are already a finished product and are ready to be eaten." This is another advantage of purchasing fèves, as the cocoa butter percentages are higher for tempering. bittersweet as it's likely to have less sugar than semi-sweet.
Alexandra's method for tempering chocolate is called the seed or seeding method. The basic idea is that you add tempered chocolate to melted, untempered chocolate. The tempered chocolate will introduce (or seed) the proper crystalline structure to the overall batch and bring everything into temper.
About 2/3 of the chocolate is melted and removed from the heat. The remaining 1/3 is dropped into the melted chocolate and slowly stirred until it melts and cools slightly. Note: The final 1/3 needs to be tempered chocolate that has not bloomed.
Keeping the chocolate in temper
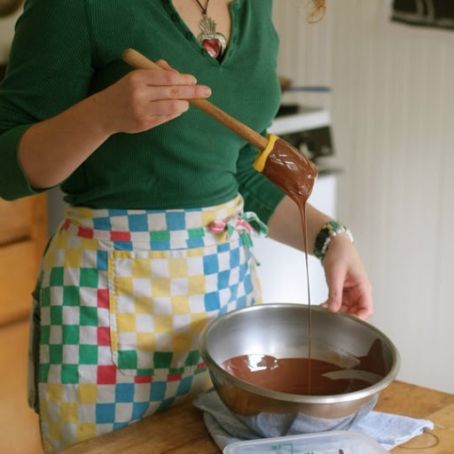
Tempered chocolate solidifies quickly as it cools, so it is important to maintain its temperature and to keep it moving while you are dipping. Gently stirring (or having a friend stir as you dip) keeps the chocolate fluid and prevents streaks. As you stir, the chocolate will continue to cool, and it will go out of temper. This can take anywhere from 2 to 10 minutes, depending on the temperature of your kitchen and the quantity of chocolate (the more chocolate you have, the longer it will stay in temper). You will know it is getting too cool when it become matte, begins to set up on the sides, or become so thick that it takes more energy to stir.
Keep your pot of hot water near at hand, and as soon as you see these signs, submerge the bottom of the bowl in the hot water for 1-2 seconds, scraping the chocolate up from the bottom and mixing throughout. Quickly remove the bowl from the hot water and keep stirring to evenly disperse the heat. Once evenly stirred, test on your skin to make sure it is still cool. If it is no longer cool, you will need to begin the tempering process all over again.
 1 Picture
Ingredients
- Good quality chocolate, between 60-70%
- Equipment
- Medium pot for heating water
- Metal that will fit snuggly in the pot
- Kitchen towel
- Rubber or silicone spatula
- Conditions
- A cold room (room temp or below), low humidity – do not attempt before a thunderstorm!
Details
Adapted from thekitchn.com
Preparation
Step 1
Heat the water: Fill the pot with water and bring it up to a simmer. Turn off the heat.
Begin melting the chocolate: Make sure your bowl is very dry, as any drops of water will seize up the chocolate. Put about 2/3 of your chocolate in the bowl and place it over the water. The water should be touching a large area of the bottom of the bowl. Be very careful that the water does not splash into the bowl. Do not stir! Let the chocolate sit in bowl over the hot water, uncovered, until it is about 2/3 melted.
Stir until completely melted: After the chocolate is about 2/3 melted, gently stir it and allow it to melt further. Letting the chocolate partially melt before stirring prevents creating large clumps of solid chocolate glued together by melted, now re-solidified chocolate. Be very careful not to allow any water into the bowl.
Test the temperature of the chocolate: Lift the spatula up to your lower lip and dab a small dot onto the place just below your lower lip. It should sting slightly (but not too much!).
Add remaining chocolate: Remove the bowl from the water and set it on a folded kitchen towel to absorb any water from the bottom of the bowl. Stir in the remaining chocolate (the 'seed'). Stir slowly and gently until the chocolate is completely melted. The chocolate will begin to thicken and become less shiny and more matte as it cools. This part of the process can take up to half an hour. If you want to speed things up, take the bowl to a cooler place (outside, for example – but not the rain!).
Test again for temperature: Once all the seed chocolate has melted, touch the spatula to your lower lip area again. The chocolate should feel cooler than your body temperature. If it feels warmer than your skin, you can drop in a few more pieces of chocolate and keep stirring. If you don’t feel anything, this means the chocolate is at about your body temperature, and you need to keep stirring gently until it cools down. When it is ready it will feel refreshing on your skin. You are now ready to dip your ganache!
Keeping the chocolate in temper. Continue to stir the chocolate as you dip. If the chocolate cools too much, turns matte, and begins to thicken, place the bottom of the bowl back into the hot water for 1 or 2 seconds. Remove quickly and stir the warmer chocolate up from the bottom and throughout the bowl. Test to be sure it has not gotten too hot and resume dipping.
Review this recipe