
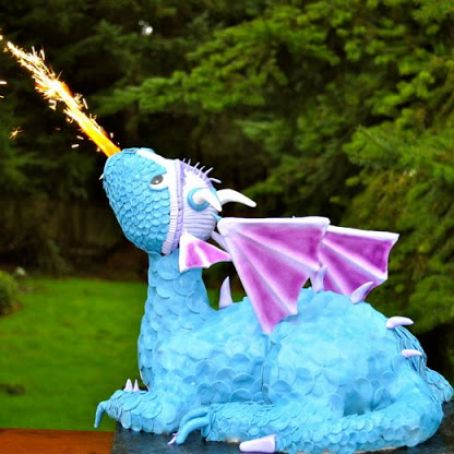
How To Make a Fire Breathing Dragon Cake
By MJH
 1 Picture
Ingredients
- Craft store:
- See Website for step by step pictures: http://cakefixation.blogspot.com/2012/03/how-to-make-fire-breathing-dragon-cake.html
- Wilton Pan 12x18x2
- Parchment Paper
- Heating Core
- Non Stick Pan Spray
- 1 " Thick Sheet of Styrofoam (optional)
- Candy Melts
- Black Fancy Foil
- Tape (any kind)
- Turntable
- 1 Sheet of Foam Core
- Off Set Spatula
- Xacto Knife and Blades
- Paint Brushes
- Wooden Dowel Rods
- Dowel Rod Cutter (mine are Fiskar brand)
- Pencil Sharpener
- Food Safe Gloves
- Rolling Pin
- Wilton Pizza Cutter Tool
- Ruler
- Circle cutters
- Hot Glue Gun and Glue Sticks
- Gumpaste modeling tools
- Hardware store:
- Electric Screwdriver
- 1/2 " pvc pipe
- Pipe cutter (ratcheting kind)
- 1/2 " steel floor flange and 4 screws
- 1/2 pvc male adapter
- 1/2 pvc tee
- 1/2 pvc 45 degree Ell
- Heavy duty felt pads
- 16 x 16 Wood Board (3/4" thick)
- Grocery Store/Other:
- Knife for cutting styrofoam and cake
- Bamboo Skewers
- Corn Starch
- Ingredients for Rice cereal treats, Cake, Buttercream and Modeling chocolate
- Cake Sparklers (red tip removed)
- Airbrush and violet color
- Vodka
- Order On-line From Shop Bakers Nook:
- White Satin Ice fondant (5lbs)
- Tylose Powder
- Americolor Gel Colors - Regal purple, Black, Sky Blue
- Recipes:
- 2 Recipes of Buttercream Dream (for tastier buttercream use REAL vanilla, not clear)
- 3 Recipes of Semi Sweet Modelling Chocolate
- 2 Recipes of Kraft's Rice Crispy Treats
- 3 Recipes of Super Enhanced Cake Formula
Details
Servings 1
Adapted from cakefixation.blogspot.com
Preparation
Step 1
1.Prepare your board
If you are traveling with the cake it is recommended using a styrofoam sheet cut to the same size as your wood board.
This will help keep the wings in place.
Hot glue it onto the board.
If you are not traveling this is not needed.
Place a steel flange in the corner and cut a hole in the styrofoam so the flange can see through.
Using an electric screwdriver screw into place.
Add felt feet and cover in fancy foil like you would wrap a gift and tape to the underside of the board.
Poke a small hole in the foil so the flange can see through.
Cut pvc pipe with ratcheting pipe cutter.
The smallest piece of pvc pipe goes into the top of the tee.
The medium sized piece of pvc pipe goes between the tee and 45 degree ell.
It doesn't need to be assembled just yet though. We're just preparing for later.
Be sure to clean your piping very well.
Everything except the steel flange is food safe.
Your water comes through these exact same pipes... so don't worry.
2. Make Wings and Ears
Cut dowel rods(sharpened on one end and cut at an angle or straight on the other end) and glue together using candy melts.
Color your fondant and knead in a generous amount of tylose powder.
This will make it harden like gumpaste.
Cover both sides of the wings with your gumpaste and glue together with gum glue (a mixture of water and a little tylose powder) that you paint between the fondant.
Let the wings dry for at least two days.
The ears are made with skewers and are much smaller.
Repeat the process of glueing and covering with gumpaste.
Allow both to dry for at least two days.
If you are worried about them breaking make extra.
3. Bake and Layer Cake
If using a Kitchenaid mixer, only two recipes will fit in it at a time so make 2 recipes, poured it into the pan, made 1 more recipe and poured it on top.
Be sure to spray your pan with non stick spray and use a heating core that is also sprayed.
Bake until a skewer is inserted and comes out clean.
Make cake a week in advance and freeze it.
Let it thaw out when you are ready to begin.
Working with a cold cake is much easier than room temp.
Cut your cake in half.
After separating the two pieces cut the top off each cake and tort. Layer the buttercream and cake.
You should have 4 layers of cake and 3 layers of buttercream.
Chill the cake for a minimum of 30 minutes.
4. Carve Cake
Start carving a little at a time.
The 4th picture is the dragon's front which slopes down, and the last picture is the back.
SAVE YOUR SCRAPS.
More carving will be done later but this is a good start.
Trace around the pvc male adaptor and cut out a hole with your Xacto knife.
5. Form Tail and Legs
Put your scraps into your mixer and mix until you get yummy cake pop filling.
If you don't like the texture of cake pop filling you could use rice cereal treats instead.
Cake pop filling works best because it's easy to mold.
With gloved hands form the tail, arms and legs.
Add a pointed top to the dragon's back.
Cover with a thin layer of buttercream.
If you are getting too many crumbs or the cake is tearing while you are applying the buttercream; chill it for a bit and then try again.
After you have applied the buttercream return it to the refrigerator for at least 30 minutes.
6. Trim Foam Core and Affix to Board
Using an Xacto knife cut away the extra foam core leaving a space still uncut for the neck.
Glue to the board using candy melts.
Wipe away any chocolate that is showing.
7. Form Neck and Head
Form neck and head with rice cereal treats.
If they are too hard to work with pop them in the microwave for a few seconds until they are soft.
Once the cereal treats are formed and re-harden, they are easy to cut or trim with a knife.
Add a layer of modeling chocolate to the outside of the cereal treats. Stick skewers into the sides of the face and under the chin for extra support.
Cut away the extra foam core around the neck.
8. Decorate
Use cornstarch to dust my surface before rolling out the fondant. You could also use powdered sugar, or a mixture of the two.
Cut out different sized circles for the scales on the head, body, legs and tail. Glue down with gum glue.
Add more details!
Airbrush the wings and ears. Push the wings all the way through the foam core and down into the stryofoam board. It will take a lot of twisting and pushing to get it through the boards. Also, insert the ears. If needed use some candy melts to help secure the ears in place.
When finished spray the dragon with vodka through your airbrush to make it shiny. If you do not have an airbrush rub shortening on the outside to remove the powder.
Put your cake sparkler into the pvc pipe in the dragon's mouth and light.
Review this recipe