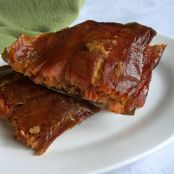
Best smoked salmon
By Flora
BEST SMOKED SALMON (LOX); Spyguy (Mitch Unger)
After searching for various recipes for good LOX, I finally created this one which is a compilation of many I have heard of, tried and modified. Making good smoked salmon isn't a mystery or a matter of luck; it's a matter of patience and time. With this recipe I have been consistent with my results. This process is for cold smoking salmon (LOX) only, preferably with a Bradley smoker.
I have tried many recipes with very good results. After speaking to a few people, who do this for a living. I got the process they use but they wouldn't give up the recipe so I created my own. You may add any flavor you want to the wet brine. More garlic, or soy sauce, lemon, coriander seeds; there are no rules for flavor. You may use more or less brown sugar depending on your tastes, but try mine as is and adjust after you try it. For those who try it you won't be sorry. Please post your results, and feel free to share this with others but please give credit where it is due.
IMPORTANT: Please read these instructions over a few times before you attempt to use this recipe, it will help you understand the process.
I HAVE TRIED TO EMPHASIZE AND DETAIL THE CRITICAL STEPS AND WHERE TEMPERATURE IS IMPORTANT. If I overdid the details, you’ll get no apology from me. When I did it for my first time, I would have killed for details; details; details.
These instructions are for an average sized fish of 10-12 lbs (before being filleted). Coho is best but I have used Atlantic with success as well. For smaller fish shorten the time and for bigger fish lengthen time.
SALMON PREPARATION:
If you are filleting whole salmon, leave skin on and remove pin bones (a small pair of clean needle nose pliers works best for removing bones that are still in the flesh). If you are buying filleted salmon, purchase whole fillets with skin on, and remove any remaining bones. Rinse if you want and pat dry (not completely dry). Leave fillets whole at this point with the skin on.
BRINING: (Two-Step process)
Step One - Dry Brine:
5 lbs. Kosher or canning salt,
6 lbs. Dark brown sugar,
1. Mix salt and sugar well, using your hands to break up the chunks of brown sugar. This will be used for dry brining the fish. You must use COARSE (non iodized) OR KOSHER SALT. Any left over dry mix can be place in a sealed container or Ziploc bags. It will keep for a long time until you need it again.
2. Using a small container that is just wide and long enough to lay your whole fillets flat; spread an even 1/2” layer of the dry brine mix on the bottom (I use a Rubbermaid container just long enough for the fillets and wide enough for two side by side). Lay the first layer of fillets skin side down on the dry mix. Now cover fillets with more dry mix (1/2"). Place next layer of fillets on top with skin side up (meat to meat). Cover with 1/2" dry mix. Make sure fish is completely covered in the mix (that's why the size of your container is important so you don't waste excess mix). Continue to layer the fish. You can place them anyway you like as long as they are relatively straight and flat. This process will remove excess moisture from the fish and really firm it up.
Place fish in the refrigerator for 7-8 hours. IMPORTANT: If you forget this part of the process and dry brine for too long, you will ruin your fish. Set a timer or maybe two of them so you don't forget.
After the 7-8 hours have passed you will see a considerable amount of syrupy liquid in the bottom of the container (the moisture from the fish) now take it out of the refrigerator, and remove 1 fillet at a time and cut in half (so it fits the Bradley smoker) rinse the mixture off the fish completely. Fish will seem hard, firm and considerably smaller than when you started. The next step will change the texture again. Discard the syrupy liquid from the dry brine process (do not reuse).
Step 2 Wet Brine;
3.5 gal. Water
6 cups Kosher or Coarse (non-iodine) Salt
6 cups Brown Sugar
1-2 cups Real Maple syrup
1/4 cup Whole black peppercorns
2 Cloves garlic
Chopped fresh dill, to taste
Prepare Wet Brine Solution:
After placing the fish is in the refrigerator, begin to prepare your wet brine. In a 5 gallon food bucket (or non-metal container large enough to hold you fish and brine), mix all ingredients well, making sure that all the salt and sugar is completely dissolved. IMPORTANT: check salinity (salt concentration) - a fresh raw egg (in the shell) will float in the mixture. If it doesn't add another 1/2 cup salt and mix well, then recheck to see if the egg will float. If it still doesn't float add another 1/2 cup salt repeat as needed until the egg floats. Let the brine set for at least 5 hours before using it.
Place filets that have been dry brined, rinsed, and halved, into the wet brine. Cover with a plate so all fish are completely submerged. Brine for 7-9 hours (refrigeration at this point is optional as the dry brine has pretty much "cooked the fish" already). I do recommend at some point near the middle of the wet process, you move the fillets around in the bucket in case some fillets are a little close. When they are done, they need to be freshened (this removes excess salt).
Freshening Your Fillet:
Remove the fillets from the brine and rinse in fresh water. Discard brine and rinse out your bucket (or container that you wet brined the fish in), making sure all spices, peppercorns etc are removed. Now put the fillets back in the bucket and fill with clean water. Let the water run into the bucket (do not use too much pressure or you will damage the fish) for 1/2 hour stirring the fish gently with your hand every 7-10 minutes. Taste a small piece of the fish. If still too salty rinse for another 10 minutes but no more or the fish will begin to waterlog (swell). I do mine for 30 minutes and consistently have excellent results.
Drying Before Smoking:
Remove fish pat dry with paper towel. Using your Bradley racks (Teflon coated ones work best), turn the racks upside down and lay the fish on the racks skin side down. It is important to use the racks upside down, this way the fish will be suspended and be able to air dry top and bottom. Allow to dry for approx 1 hour; when they become a little sticky on the meat side they are done and ready for smoke (remember COLD smoke only). You may smoke from 1-3 hours depending on your preferences and tastes with alder smoke. Make sure auxiliary burner is off or better yet unplugged from the smoke generator. I use a Polder barbeque thermometer with the remote pager and have the probe hanging through the top vent and the pager to notify me if the temp gets to 75.
WATCH THE TEMPERATURE CAREFULLY IF IT GOES ABOVE 80 YOUR FISH IS RUINED.
Fill the drip bowl with ice and add a good block of ice between the bottom shelf and the lower plate; (even if you cover 2/3 of the holes in the plate, it has no effect on the smoke reaching the fish). As the ice melts it drips into the bowl (not on the smoke burner) good design by Bradley. Place a large aluminum pan under the drip bowl to catch any water will overflow from the water bowl. Doing it this way maintains 60-75 degrees when it’s -10 outside. When my pager goes off telling me it’s too warm, I know the ice has melted and I need to add more. You could use the bottom shelf and place an ice filled aluminum pan on the rack, but that way you lose the ability to use the bottom shelf. That's up to you. Just watch the temperature (do I need to say it again)
 0 Picture

Ingredients
- see description
Details
Preparation
Step 1
see description
You'll also love
-
 Festive Winter Salad with Walnuts...
0/5
(0 Votes)
Festive Winter Salad with Walnuts...
0/5
(0 Votes)
-
Butternut Squash Soup with Garlic...
5/5
(1 Votes)
-
EASY SHRIMP NEWBURG
0/5
(0 Votes)
-
Cajun Shrimp Boil
0/5
(0 Votes)
-
Pan-Seared Tuna with Mandarin...
0/5
(0 Votes)
-
Smoked Trout Rillettes with...
0/5
(0 Votes)
-
Salmon Loaf with Dill Sauce
0/5
(0 Votes)
-
Asparagus and Smoked Salmon Salad
0/5
(0 Votes)
Review this recipe