Canning Chicken in a Pressure Cooker – Raw Pack
By AzWench
These comments are not mine, they were posted by the creator of this recipe:
The first time I heard my friend mention that she bottles chicken I thought, “Whoever heard of canning chicken??!” It sounded like a pain to me. My interest wasn’t piqued until I went to her house for a birthday lunch one day and ate some delicious chicken chowder she had made. The soup was yummy, but the chicken in it was to die for! It was so…. so…. shreddable. Yes, that’s the perfect adjective! It was moist and fell apart with the slightest pressure. It was NOT like crockpot chicken breasts that turn grainy and ironically dry after cooking. It was NOT like boiled chicken that can get rubbery. No, this stuff was the perfect, moist, shredded chicken. I asked her how she made the chicken for the soup and she said she just used a bottle of her canned chicken. Canned chicken tastes like this?! Now I was all ears! She told me that she buys fresh Tyson chicken breasts when they go on sale at our local grocery store for $1.88 per pound. Then she loads up on them and cans them and uses them for any and every recipe that calls for cooked chicken. The next time I saw the chicken on sale (which is quite frequently at my store), I bought a lot and went to her house for a demonstration. Isn’t she a good friend? Then I borrowed her Presto pressure canner and canned chicken two more times. By then I was hooked. My husband bought me a big All American pressure canner as a surprise, and now I absolutely can’t live without the convenience and deliciousness of canned chicken!Chicken and Dumplings - The Sisters Cafe I use my canned chicken in any recipe that calls for cooked chicken. For example, I’ve used it in Enchiladas, Chicken & Dumplings (pictured above with canned chicken), Chicken Noodle Soup, Enchilada Casserole, Broccoli Chicken & Swiss Soup, Pasta Dishes, Wraps, Pot Pie, BBQ Chicken Pizza, etc etc etc! It makes preparing dinner a SNAP. Seriously, think of it. Skipping the step of preparing and cooking the chicken cuts down on the meal preparation time by a TON! Now add the fact that you buy all that chicken at a great deal (way cheaper than buying frozen breasts), PLUS consider that the chicken tastes so moist, flavorful and has the perfect shredded texture. Sold yet? Oh yeah, one more thing – canning chicken is SO EASY. It’s as simple as putting some salt and bouillon in an empty jar and pushing some raw chicken in there and then canning it. It’s ridiculously simple. In fact, this would be a great thing to start on for a beginning canner.
Here’s how to do it. :)
I listed the ingredients and equipment needed below. A word about pressure canners: You will need a 23 Quart liquid capacity pressure canner, which holds 18-20 Pints or 7 Quarts. This is the canner that you’ll see in these pictures. You can buy the Presto brand for around $70. I recently got a 30 Quart liquid capacity All American canner, which can hold 14 Quart sized jars (or 19 Pints). But the 23 Quart liquid capacity works great because you really probably want to can pints anyway, since a pint holds about the amount of chicken you would use in one meal. When I use my quarts of chicken, I usually use half the jar one night and store the leftovers in the fridge for another night that week. One more thing: Read your pressure canner’s instruction manual first. It will help you understand what the gadgets are on the canner and their names, and you’ll feel more comfortable using it the first time. For more information on canning poultry, research government or university extension websites, such as National Center for Home Food Preservation (this is a fantastic website; I especially thought this publication from the University of Georgia cooperative extension office was helpful: Preserving Food), or The Ohio State University Extension. I read a lot of these websites and pamphlets before I began canning, since I like to make sure that I am doing it perfectly correct. :)
One more thing: The below directions are for a 23 Quart liquid capacity pressure canner (such as the Presto brand my friend has), which is a dial-gauge pressure canner. For instructions specific to a 30 Quart liquid capacity canner (like my All American), which is a weighted-gauge pressure canner, open this Google document: Canning Chicken in a 30-quart weighted-gauge pressure canner. Remember, my instructions below are not meant to replace the important step of reading your Pressure Canner’s user manual instructions. I am only offering my instructions as an additional help. :)
Happy canning!
Ingredients
- EQUIPMENT:
- Fresh (not frozen) boneless chicken breasts. 7 quarts will require about 25 to 30 pounds of chicken. 20 pints will require more (my guess is 35 to 40 pounds.)
- Salt. Canning or pickling salt is recommended because table salt contains a non-caking filler which may cause cloudiness in the bottom of the jar. (However, we use table salt anyway.)
- Chicken bouillon granules. (The dry kind; not ‘Better than Bouillon’ varieties)
- 23-Quart liquid capacity pressure canner. It has 7 quart capacity or 20 pint capacity (if you have two racks -one for the bottom of the canner and one between layers of pint jars. Otherwise it can hold 18 pints stagger stacked).
- 18 to 20 pint-sized glass jars or 7 quart-sized glass jars, brand new lids, and bands (the bands don’t have to be new).
Details
Servings 25
Adapted from thesisterscafe.com
Preparation
Step 1
Prepare chicken: Remove any excess fat from the fresh chicken breasts, then cut in large chunks (4 or 5 pieces per breast). Set aside in the refrigerator until you are ready to fill the jars.
Warm up the canning jars by running them through a dishwasher cycle (heated dry turned on) without any detergent. Leave door closed until ready to fill jars.
Heat 3 quarts of water. You will be pouring this into the canner. (You don’t want to boil it, but it just needs to be hot. For raw packed foods (like as in this instance), the water should only be brought to 140°F.)
Wash lids with soap and water and set aside. Preheating lids is NOT necessary. However, if you want to, cover lids with water in a small saucepan and bring to a simmer (180°F) over medium heat for 10 minutes. Keep lids hot until ready to use. To prevent seal failure, do not boil lids.
Using your warmed up pint-sized jars, pour 1/2 teaspoon salt and scant 1/2 teaspoon chicken bouillon granules into the bottom of each jar. If using quart-sized jars, use 1 teaspoon salt and a scant 1 teaspoon chicken bouillon granules.
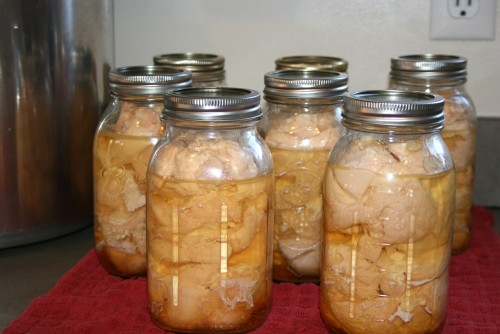
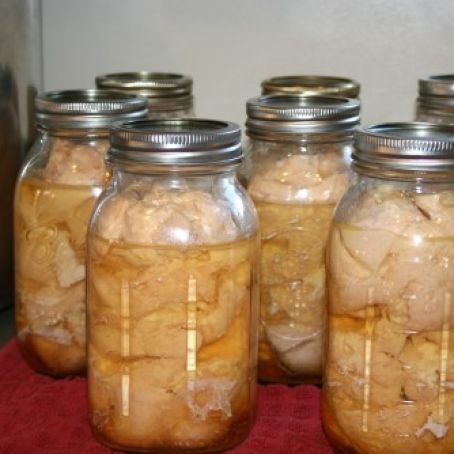
Loosely fill jars with chicken chunks, leaving 1 1/4 -inch headspace for expansion during processing. Do not add any water or broth. The meat will form its own liquid as it cooks in the canner. (FYI, in case you are wondering, this picture does not show 1 1/4 -inch headspace. So leave more headspace than shown.)
Wipe the rim of the jar with a clean, damp paper towel to remove any bits of chicken or grease that may interfere with the seal. Center a lid on the jar. Apply band and adjust until fit is fingertip tight.
Pour 3 quarts of boiling water into the canner, up to the 3 quart water line marked on the inside (in my canner, this is the lowest line marked near the bottom; your instruction manual will confirm if this is the case for your canner). Always add water before setting jars in the canner. Set the rack inside and evenly place jars on the rack. The jars may touch. If you have an extra rack to place between the layers of the pint jars, you may set 10 pint jars on the bottom, put the rack on them, then stagger stack 10 more jars on the top layer. If you do not have an extra rack, you may only be able to stagger stack 9 jars on the top layer. (Stagger stack means you place one jar on top of two.)
Cover. Do not place the pressure regulator on the vent pipe yet. Turn heat on high.
When steam begins flowing steadily out of the vent pipe (for me, it usually heats for about 15 minutes before this occurs), put timer on for 10 minutes. Maintain a moderate steam flow. This procedure is called “exhausting”.
After the 10 minutes are up, put the pressure regulator on the vent pipe, increase the heat to high, and wait for the pressure to reach 11 pounds pressure (if you are below 2,000 feet altitude). (Plan on 5 to 10 minutes to reach pressure.) (Process at 12-pounds for 2,001-4,000 feet altitude, and 13-pounds for 4,001-6,000 feet.)
Once your pressure has been achieved, put the timer on for 75 minutes if using pints and 90 minutes if using quarts. Adjust your heat so that the correct pressure is maintained. To do so, you will need to keep checking it.
When the time is up, turn off heat. Wait for the pressure to drop. Pressure is completed reduced when the air vent/ cover lock has dropped and no steam escapes when the pressure regulator is tilted. This may take 45 minutes or longer. (Leave the pressure regulator on the vent pipe during this time.)
When pressure has been completely reduced (and the air vent/cover lock has dropped), remove pressure regulator from vent pipe and let canner cool for 10 minutes.
Take the jars out of the canner and set on a towel to cool. (FYI, the liquid in the jars will not reach up to the top. If you notice some chicken juice residue on the outside of your bottles, that’s okay. Sometimes they can leak if they have been packed too tightly, but it doesn’t wreck the seal.) Do not disturb the cans as they cool. After the recommended 12 hours, you may wipe the jars off, test the seals, remove bands, date the lids with a permanent marker, and store in a cool, dry place. (If any of the lids have not sealed, you will want to place the jar in the fridge for immediate use or reprocess it, before the 12 hour cooling period of course. To know if it is not sealed before the 12 hour mark, look at the lid closely to see if it has flattened or turned concave on the top. If it has, it is sealed. If it is convex, it may not have sealed and I would store it in the fridge until you can manually test it by pressing the center of the lid and seeing if it flexes up and down when pressed.)
You'll also love
-
 Cheesy Chicken Cutlets with Ham &...
3.6/5
(7 Votes)
Cheesy Chicken Cutlets with Ham &...
3.6/5
(7 Votes)
-
 Chicken Divan - Magic Pan
3.6/5
(74 Votes)
Chicken Divan - Magic Pan
3.6/5
(74 Votes)
-
Pressure-Cooker Chop Suey
3.7/5
(15 Votes)
-
Pressure Cooker Chicken Adobo
2.5/5
(2 Votes)
Review this recipe