
Sweet Red Pepper Jelly
By Foodiewife
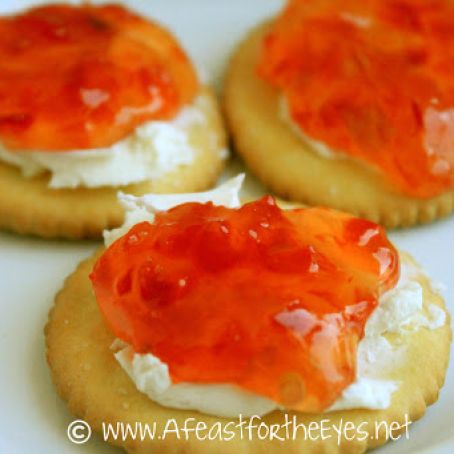
Pepper Jelly originated in the South. Most of the recipes I've seen uses green peppers with plenty of jalapeño or habanero jelly. That's all good and well, but I much prefer a sweet red pepper jelly, with just a "hint" of heat and the right balance of vinegar "tang". Slathered on top of a cream cheese cracker, I could eat this all day long. This jelly is so good, that it would make perfect Christmas gifts! I adapted this recipe from Ball Canning, by using red bell peppers. I also used the Ball Canning Automatic Jam & Jelly Maker and the Fresh Tech Auto Canner-- but you can still make this at home with a more traditional canning pot and rack and a stove. I've given directions for both ways of preparing this delicious condiment. You can see how I made this on my food blog. Just click on the recipe source.
Ingredients
- 3 1/2 cups sweet red bell peppers (about 3 to 4 large)
- 1/2 cup jalapeno peppers (about 3 to 4 small)*
- 1 cup cider vinegar (5% acidity)
- 4-1/2 tablespoons Ball® brand RealFruit™ Classic Pectin
- 1/2 teaspoon butter (optional, reduces foaming)
- 5 cups granulated sugar
- 6 Ball® brand Half Pint (8-ounce) Glass Preserving Jars
- NOTE: I used only 1 jalapeno pepper, and was happy with the hint of heat, without being dragon breathing hot.
Details
Servings 6
Preparation time 15mins
Cooking time 45mins
Adapted from afeastfortheeyes.net
Preparation
Step 1
If you are using your stove top to make jelly:
Remove stems and seeds from red bell peppers and finely chop. (I used my food processor, and pulsed them until they were fine enough.) Measure 3 1/2 cups chopped bell peppers.
Note: I placed the finely chopped peppers into a fine strainer and pressed out the excess liquid.
Remove stems, seeds, and veins from jalapeño peppers* and finely chop. Measure 1/2 cup chopped jalapeno peppers. Measure remaining ingredients for your recipe; set aside.
Place chopped bell peppers and jalapeño peppers in an 8-quart saucepan. Add vinegar. Gradually stir in Ball® brand RealFruit™ Classic Pectin. Add butter, if using. Bring mixture to a full rolling boil that cannot be stirred down, over high heat, stirring constantly.
Add entire measure of sugar, stirring to dissolve. Return mixture to a full rolling boil. Boil hard 1 minute, stirring constantly. Remove from heat. Skim foam, if necessary, from top of jelly.
If using the Ball Canning Automatic Jam & Jelly Maker:
Note: I placed the finely chopped peppers into a fine strainer and pressed out the excess liquid.
Sprinkle pectin evenly over bottom of the Pot fitted with the Stirrer. Add peppers evenly over pectin. Pour vinegar evenly over peppers. Add butter to help reduce foaming.
Press Jelly button – the cook time will automatically default to 25 minutes. Press the (–) minus button until the time reads 21 minutes. Press Enter.
Wait 4 minutes for appliance to sound 4 short beeps indicating that it is time to add sugar. Add sugar gradually while Stirrer continues running. Place the Glass Lid on the Pot.
The appliance will continue to automatically stir your ingredients while it cooks. Stay within earshot of the Jam & Jelly Maker, the appliance will beep again at the end of the process signaling jelly cooking is complete. Press Cancel, unplug the appliance and immediately remove Glass Lid.
Remove Stirrer using a pot holder. Skim foam, if necessary, from top of jelly.
Preserve pepper jelly immediately, using 1 of the 3 ways listed below.
Prepare Your Gear (while jam or jelly is being made in your Automatic Jam & Jelly Maker)
Fill canner or stockpot half full with water. Place lid on canner. Heat to a simmer. Keep canning rack or Canning Discovery™ Kit canning rack with lifter to the side until ready to use.
Wash jars, lids and bands in hot, soapy water. Rinse well.
Keep jars warm until ready to use, in order to minimize risk of breakage when filling with hot jam or jelly. You can heat them in your canner or stockpot of simmering water, or in a heated dishwasher. Set lids and bands aside in your work area.
Fill Your Jars:
Ladle hot jam into hot jars, one at a time, leaving 1/4 inch headspace. Wipe any jam or jelly from the rims of the jars. Center lids on jars. Twist on the bands until fingertip tight.
Place filled jars in the canning rack inside the canner, ensuring jars are covered by 1-2 inches of water. Place lid on canner. Bring water to gentle, steady boil.
Process jars in boiling water for 10 minutes, adjusting for altitude. Turn off heat, remove lid and let jars stand for 5 minutes.
Remove jars from water and cool. Check lids for seal after 12 to 24 hours.
Check the Seal:
Press on center of cooled lid. If jar is sealed, the lid will not flex up or down. If it is not sealed, refrigerate immediately or re-process.
If using the Ball Canning Auto Canner (my preferred method as it's so easy to do:
Unlock and open Appliance Lid.
Remove one hot jar. Close Lid, but do not lock, to keep remaining jars hot. Ladle hot jelly into hot jar, leaving 1/4-inch headspace. Wipe any jelly from the rim of the jar. Center new lid on jar. Twist on band until fingertip tight. Return filled jar onto Rack in Inner Pot.
Repeat step 2 until all jars are filled with jelly and returned to Inner Pot. Close and lock Lid.
Press Jams & Jellies, then press Recipe 1. Press Start to begin preserving.
The appliance will start sensing your recipe, indicated by the orange Sensing light. Then, the preserving phase will begin, indicated by the orange Preserving light. When your appliance beeps and the green Ready light is flashing, your jelly has been successfully preserved! Press Stop. Unlock and open Lid.
Remove jars from Inner Pot using jar lifter and place upright on a towel. Allow to cool, undisturbed, for 12 to 24 hours. Check lids for seals and store your jars.
Note: When cutting or seeding hot peppers, wear rubber gloves to prevent hands from being burned.
Store sealed jars in pantry for up to 1 year. Jars may be stored without bands, or you may clean the underside of bands to ensure no moisture is trapped during storage.
You'll also love
-
 K's Sausage & Oyster Dressing
4.2/5
(10 Votes)
K's Sausage & Oyster Dressing
4.2/5
(10 Votes)
-
 Cream Cheese and Chicken Taquitos
3.9/5
(22 Votes)
Cream Cheese and Chicken Taquitos
3.9/5
(22 Votes)
-
 King Ranch Chicken Dip
4.1/5
(21 Votes)
King Ranch Chicken Dip
4.1/5
(21 Votes)
-
 Lasagna Dip
4.3/5
(17 Votes)
Lasagna Dip
4.3/5
(17 Votes)
-
 Tuscan Spicy Pepper Jelly
0/5
(0 Votes)
Tuscan Spicy Pepper Jelly
0/5
(0 Votes)
-
Pork Loin red pepper jelly
1/5
(1 Votes)
Review this recipe