
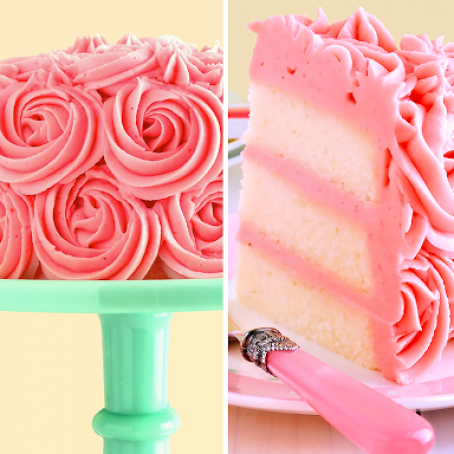
White Velvet Layer Cake with Strawberry-Raspberry Mascarpone Buttercream
By RoketJSquerl
Moist, tender white cake reminiscent of its buttermilk cake cousin, Red Velvet Cake, our White Velvet Layer Cake is flavored with pure almond extract and a hint of vanilla. It is iced with a truly extraordinary frosting, Strawberry-Raspberry Mascarpone Buttercream, fitting for the most special of occasions.

Ingredients
- For the Cake
- 2 1/2 cups (280 grams) sifted White Lily® Self-Rising Flour
- 2 cups (400 grams) granulated sugar
- 1/2 cup (1 stick/113 grams) unsalted butter, at room temperature
- 1/4 cup (48 grams) organic palm shortening, such as Spectrum Organics®
- 1/4 cup (56 grams) organic almond oil, or favorite vegetable oil
- 1 cup (240 ml) organic buttermilk, at room temperature
- 3/4 cup (180 grams) egg whites (about 6), at room temperature
- 2 teaspoons (10 ml) pure almond extract
- 1 teaspoon (5 ml) pure vanilla extract
- All-purpose flour and shortening or vegetable oil to prepare cake pans
- For the Frosting
- 1 to 1 1/2 recipes Strawberry-Raspberry Mascarpone Buttercream, recipe by Wicked Good Kitchen™
- For the Cake Adornments
- Fresh red raspberries and/or strawberries, optional
Details
Servings 1
Preparation time 60mins
Cooking time 85mins
Adapted from wickedgoodkitchen.com
Preparation
Step 1
Special Equipment
Three 8-inch by 1½- to 2-inch round cake pans
Four wire cooling racks, with the fourth being used to flip cake layers right side up
One 8-inch cardboard cake round, helpful but not necessary
Cake Turntable, such as Ateco ®, helpful but not necessary
Metal Angled or Offset Icing Spatula, such as Ateco® or Wilton®, helpful but not necessary
Metal Icing Spatula, such as Ateco® or Wilton®, helpful but not necessary
Wax paper, for lining cake plate for icing, helpful but not necessary
Piping bag, coupler and/or decorating tips, not necessary if no piping is desired
Preparation
Arrange oven rack in lower third of oven and preheat oven to 350ºF. Grease three 8-inch round cake pans with shortening or oil. Line bottoms with parchment or wax paper circles. Grease paper linings and dust lined pans with flour, tapping out the excess. Set aside.
Using an electric stand mixer fitted with paddle attachment, mix self-rising flour and sugar (or flour, baking powder, salt and baking soda if using White Lily® Bleached All-Purpose Flour as indicated in Notes section below recipe) on low speed (stir) until well combined and aerated, about 1 minute. Add butter, shortening and oil and mix on slow speed until thoroughly combined. Mixture will be very thick.
In a 2-cup glass liquid measuring cup, whisk together buttermilk, egg whites and extracts using a fork until well blended. Slowly add half of the liquid mixture to the batter and mix on low speed. Increase mixer speed to medium and beat until thoroughly combined, scraping down the sides of bowl as necessary with rubber spatula, about 2 minutes. Add remaining liquid mixture and beat just until smooth and thoroughly combined, again scraping down the sides of bowl as necessary, about 1 minute.
Using rubber spatula, scrape and pour batter into prepared pans dividing evenly (a little over 2 cups of batter per cake pan). Smooth tops evenly with rubber spatula and then rap each pan on counter surface 2 to 3 times to expel any air bubbles. This step will create a nice level cake.
Bake in preheated oven until a toothpick inserted into center comes out clean, about 25 to 30 minutes. (I have found that 28 minutes is perfect.) Cool cakes in pans on wire racks for 10 minutes. Run thin metal spatula around edges of each cake to loosen, then invert onto wire rack and peel away parchment or wax paper. Turn right side up onto wire racks (using an additional rack to flip) and cool completely or wrap while still warm to retain moisture. Wrap each cake layer tightly in plastic food wrap and keep at room temperature until ready to fill and frost.
To frost and fill cake, use a scant ¾ cup frosting between each layer and then proceed to frost the cake as desired with remaining buttercream.
To make a Rose Cake with “Rose Swirls”
Use a scant ¾ cup frosting between each layer and then proceed to frost the cake with a “crumb coat” or thin coat, but not too thin. The cake should have good coverage and you should not see the cake peeking through the frosting.
Next, assemble your pastry bag with coupler and tip. (I like to use my Ateco No. 846 tip because it makes gorgeous swirled roses. However, you can also use an open tip like the Wilton 1M.) Fill pastry bag and twist closed. Make sure your hands are not too warm or your buttercream will get too soft. You are now ready to pipe roses!
To pipe roses, start at the bottom and work around the cake to complete a full circle of roses. To pipe each rose, start in the center of where you want your rose to be. Then pipe in a circular fashion counter-clockwise going around the center point once or twice depending on the size of roses you desire. The roses don’t need to be perfect! This is what is so great about piping swirled roses as they look lovely shabby and chic. It is best to end in the same place each time and I like to end at the top right side of each rose.
Once you complete the first row around the cake, continue with the next row and then the top. To fill in any gaps, I like to pipe small stars or flourishes that contour the rose swirls. Rose Cakes are the best. So simple, but so stunning!
Notes
Tips:
Please note that prep and cook times are for the preparation and baking of the cake. They do not include the time needed to prepare the buttercream (or the component recipe for the sauce in the buttercream recipe) or the time for frosting, filling and piping decorations.
In general, prepare as many component recipes in advance for a stress-free day in the kitchen the day you assemble and frost the cake. I like to prepare each component in advance, with the exception of the buttercream, and then prepare the buttercream the day I assemble and frost the cake. By preparing component recipes in advance, it will assure you have enough time to chill the cake before slicing and serving.
How to Measure Flour for this Recipe: When measuring flour by volume with measuring cups, sift the flour first onto a sheet of wax paper then spoon flour lightly into cup before leveling off with a thin metal icing spatula or straight edge of a knife. This way, you should obtain approximately 112 grams of flour per cup (the same weight as cake flour) for a total of 280 grams for 2½ cups.
Substitution: White Lily® Bleached All-Purpose Flour may be substituted for White Lily® Self-Rising Flour in the same amount (2½ cups or 280 grams) in this recipe, but you will need to add and sift into the flour 2 teaspoons (9.6 grams) baking powder, 1 teaspoon (4.8 grams) kosher salt (or ¾ teaspoon regular table salt) and ¾ teaspoon (3.6 grams) baking soda.
How to Bring Eggs to Room Temperature: Should you forget to bring your eggs to room temperature by setting them out for an hour before starting recipe, do not worry. To quickly bring eggs to room temperature, fill a medium bowl with warm tap water—not hot, but warm so the eggs do not cook. Carefully place the eggs into the bowl of water so they are fully submerged. Allow eggs to soak for 10 to 15 minutes. Remove eggs from water and towel dry. Eggs should now be at room temperature and ready to use in recipe.
How To Properly Rap Cake Pans: Hold each pan a few inches above the counter (2 to 3 inches will do) then carefully drop pans flatly onto countertop 2 to 3 times. This step will expel any air bubbles and will ensure nice level baked cake layers.
To Make a Rose Cake: You will need 1½ recipes of Strawberry-Raspberry Mascarpone Buttercream, about 8¼ cups. This will make just enough to frost, fill, and pipe roses as shown for a 3-layer, 8-inch round cake.
Cake may be made 1 day in advance. Keep wrapped in plastic food wrap at room temperature overnight.
After assembling and frosting the layered cake it is best to chill it until the buttercream is firm, about 30 minutes to 1 hour. Chilling, before slicing the cake, will yield neater cake slices for a better plated presentation.
Store any leftover cake covered in the refrigerator.
Original Recipe Source: WickedGoodKitchen.com
Copyright © Wicked Good Kitchen. All content and images are copyright protected. Please do not use my images without prior permission. If you want to republish this recipe, please re-write the recipe in your own words. Alternatively, link back to this post for the recipe.
You'll also love
-
 Egg Salad Crostini with White...
4.8/5
(5 Votes)
Egg Salad Crostini with White...
4.8/5
(5 Votes)
-
 Tilefish in Red Sauce
4.7/5
(3 Votes)
Tilefish in Red Sauce
4.7/5
(3 Votes)
-
 Marinated White Bean Salad Jars
4.7/5
(3 Votes)
Marinated White Bean Salad Jars
4.7/5
(3 Votes)
-
 Fennel And Orange Salad
4.7/5
(3 Votes)
Fennel And Orange Salad
4.7/5
(3 Votes)
-
 Autumn Farro Salad with Kale,...
4.7/5
(3 Votes)
Autumn Farro Salad with Kale,...
4.7/5
(3 Votes)
-
 Raw Butternut Squash with...
4.7/5
(3 Votes)
Raw Butternut Squash with...
4.7/5
(3 Votes)
-
 Springtime Asparagus, Strawberry,...
4.7/5
(3 Votes)
Springtime Asparagus, Strawberry,...
4.7/5
(3 Votes)
-
 Raspberry Jam Bomboloni
4.5/5
(13 Votes)
Raspberry Jam Bomboloni
4.5/5
(13 Votes)
Review this recipe